
Connecting via an access point (Infrastructure)
![]()
- Put this machine in an unobstructed view position near the wireless LAN access point. (The recommended distance is 30 m or less.)
- It may be difficult to connect if there is a metal, aluminum sash or reinforced concrete wall between this machine and the wireless LAN access point.
- When using 2.4GHz for a connection, use it within the range of 1 to 11ch. 12ch and 13ch may be available depending on the country or region.
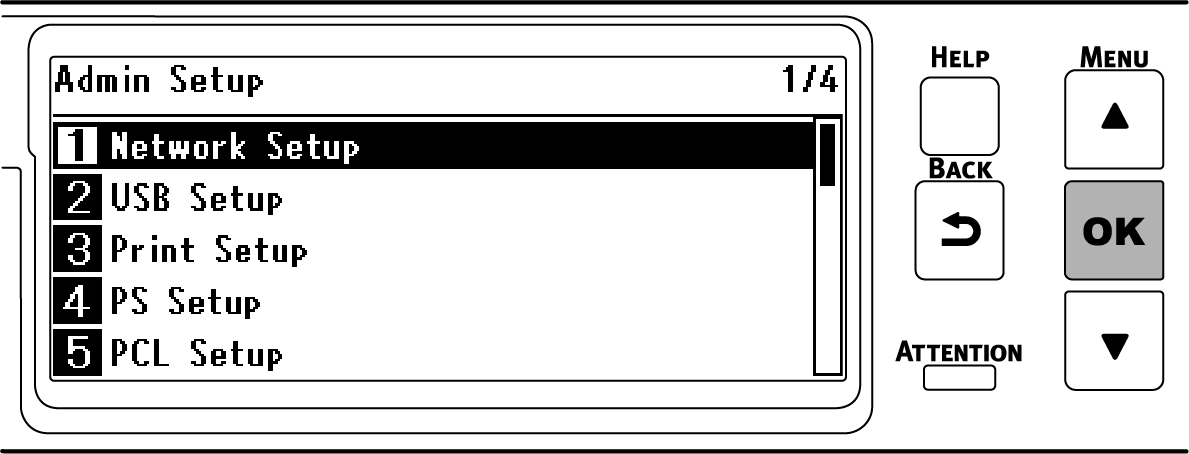
1. Enabling the wireless LAN function
- Power on this machine.
-
Press the scroll button ▼ on the operator panel several times to select [Admin Setup], and press «OK».
-
Input the admin password using the numeric keypad, and press «OK».
-
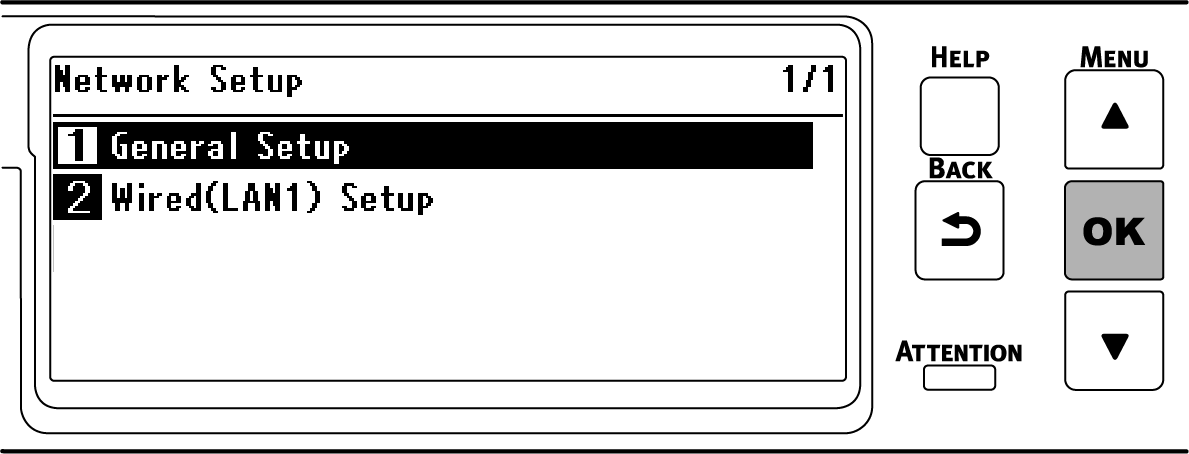
Check that [Network Setup] is selected, and press «OK».
-
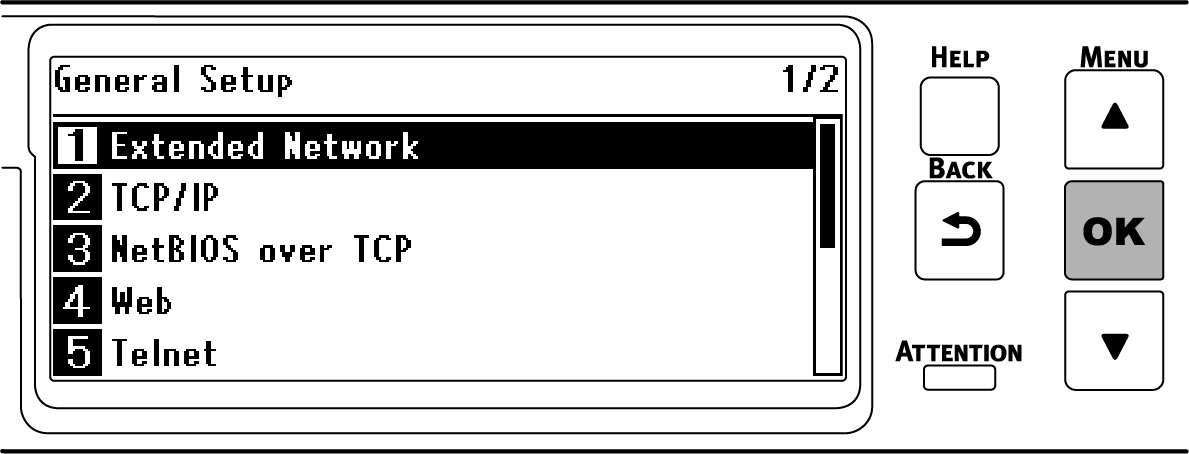
Check that [General Setup] is selected, and press «OK».
-
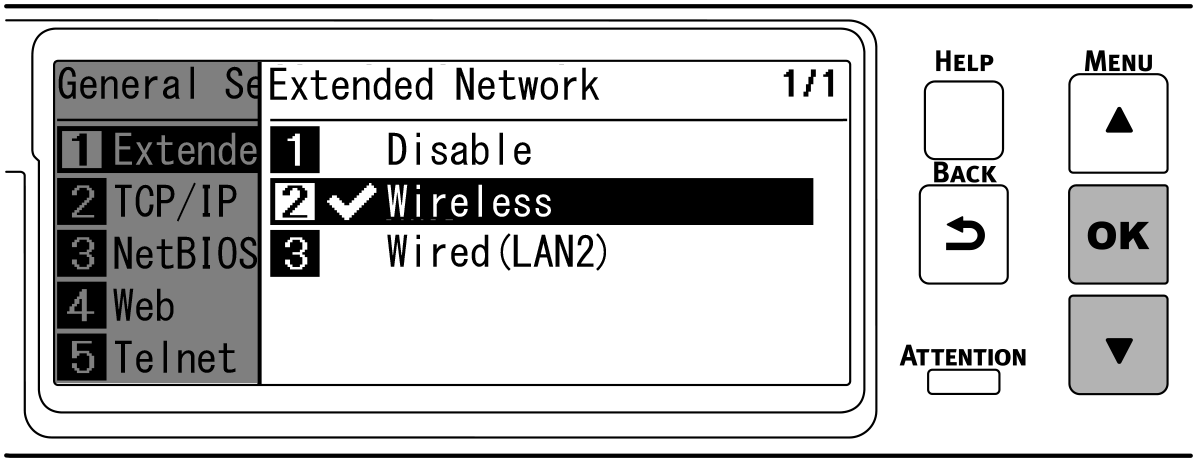
Check that [Extended Network] is selected, and press «OK».
-
Press ▼ to select [Wireless], and press «OK».
-
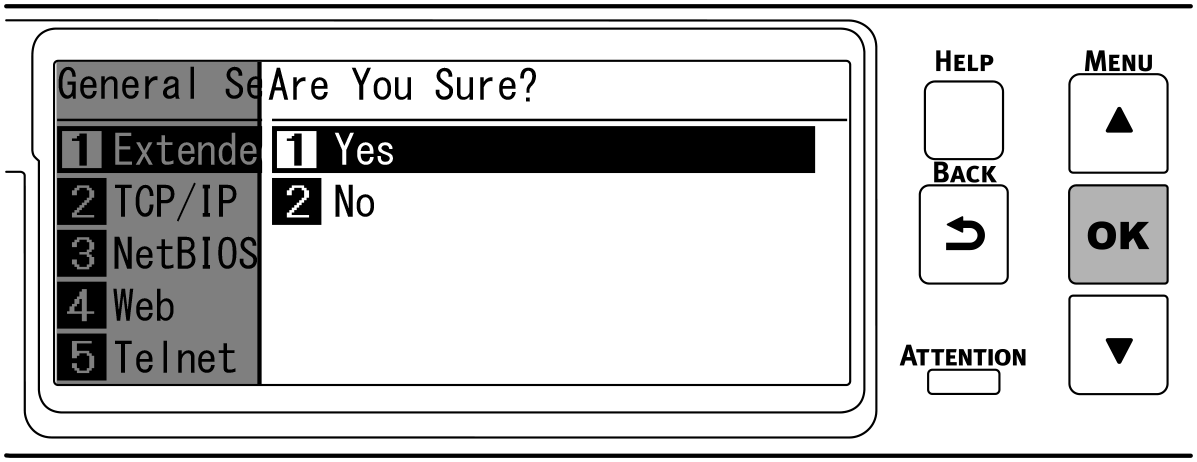
When [Are You Sure?] is displayed, check that [Yes] is selected, and press «OK».
-
Wait until the standby screen appears as this machine restarts.
If [Not connected to wireless access point] is displayed, press «OK».If "Set-up wireless?" is displayed, select [No], and press «OK».
2. Enabling infrastructure
- Press the scroll button ▼ on the operator panel several times to select [Wireless(Infrastructure) Setting], and press «OK».
-
Input the admin password using the numeric keypad, and press «OK».

- "It is not possible to use the Wireless(AP Mode) at the same time." will be displayed for about 5 seconds.
-
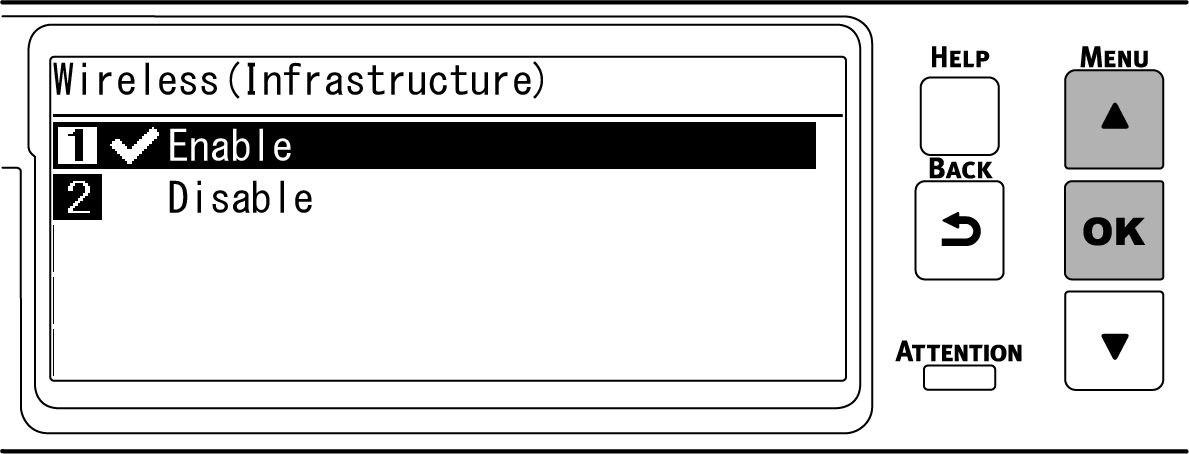
Press ▲ to select [Enable], and press «OK».
- After setting wireless(AP Mode) to [Disable], if a screen appears to ask you to check whether to enable wireless(Infrastructure), press «OK» to enable wireless (Infrastructure).
To set the IP address of this machine manually, go to " 3. Setting the IP address ".To obtain an IP address automatically, go to " 4. Connecting with the wireless access point ".
- The factory default setting is [Auto].
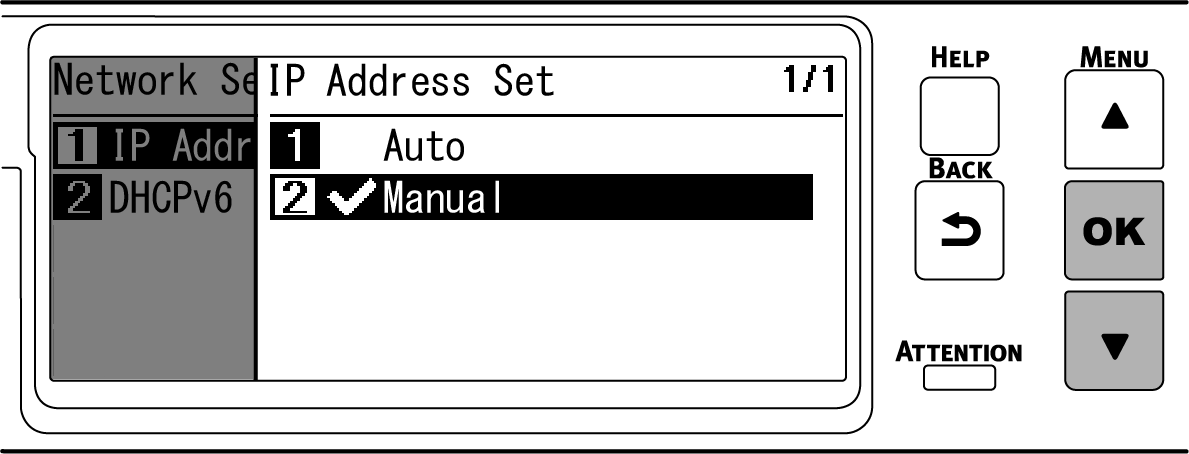
3. Setting the IP address
If you want to set the machine's IP address to a fixed value, follow the procedure below.
![]()
- For [Auto], the machine's IP address may change dynamically.
![]()
- For [IPv4 Address], set a value which is not overlapped to any other networked machines.
- If you do not use the IPv6 address, set [DHCPv6] to [Disable].
(Example)
- IP address of this machine: 192.168.101.2
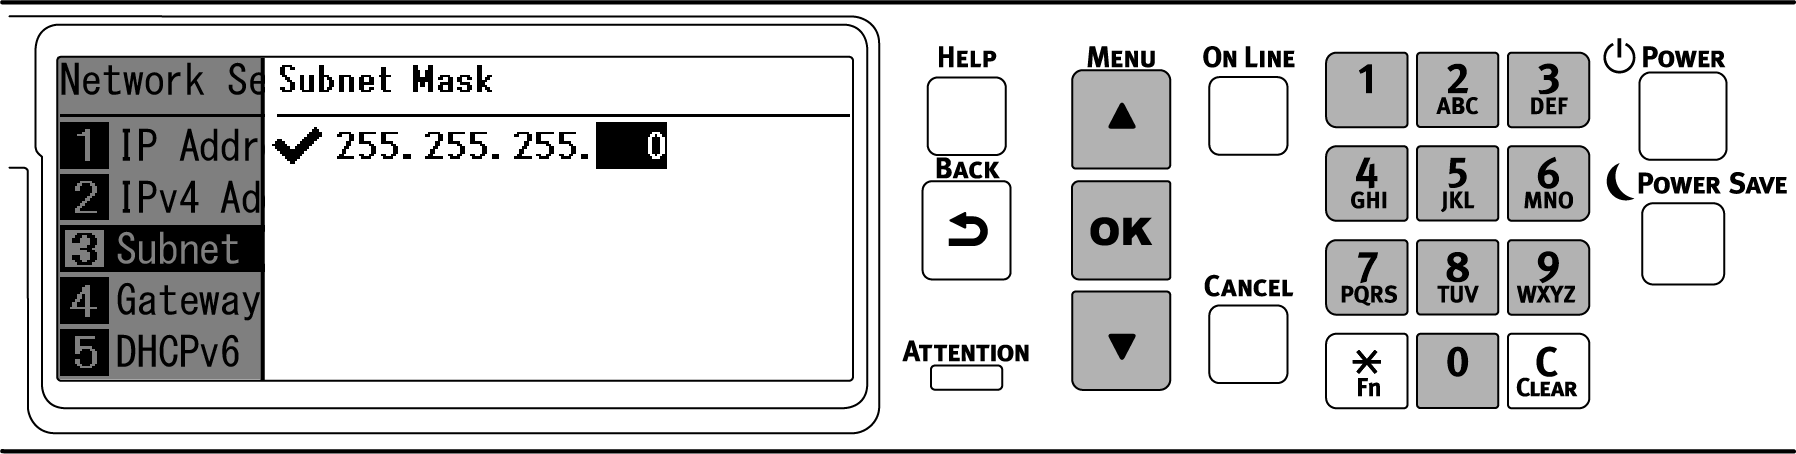
- Subnet mask: 255.255.255.0
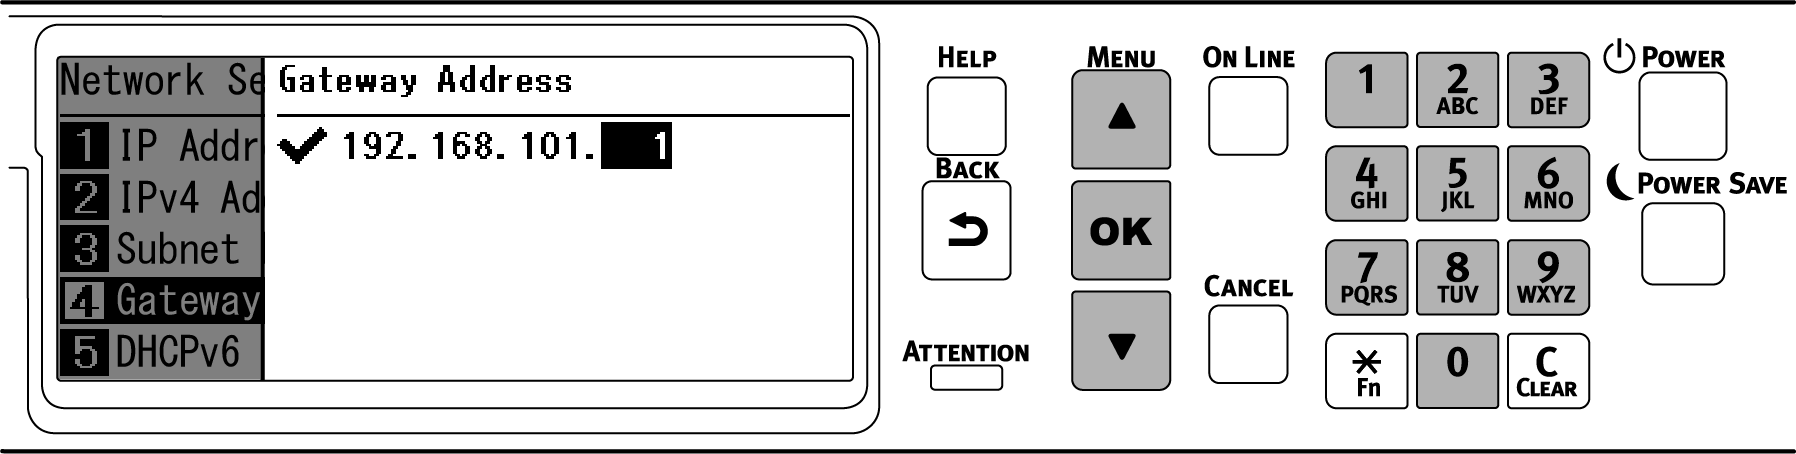
- Gateway address: 192.168.101.1
When using a wired LAN, see " Setting the IP address, etc. ".
- Press the scroll button ▼ on the operator panel several times to select [Wireless(Infrastructure) Setting], and press «OK».
-
Input the admin password using the numeric keypad, and press «OK».
- "It is not possible to use the wireless(AP Mode) at the same time." will be displayed for about 5 seconds.
-
Press ▲ to select [Enable], and press «OK».
-
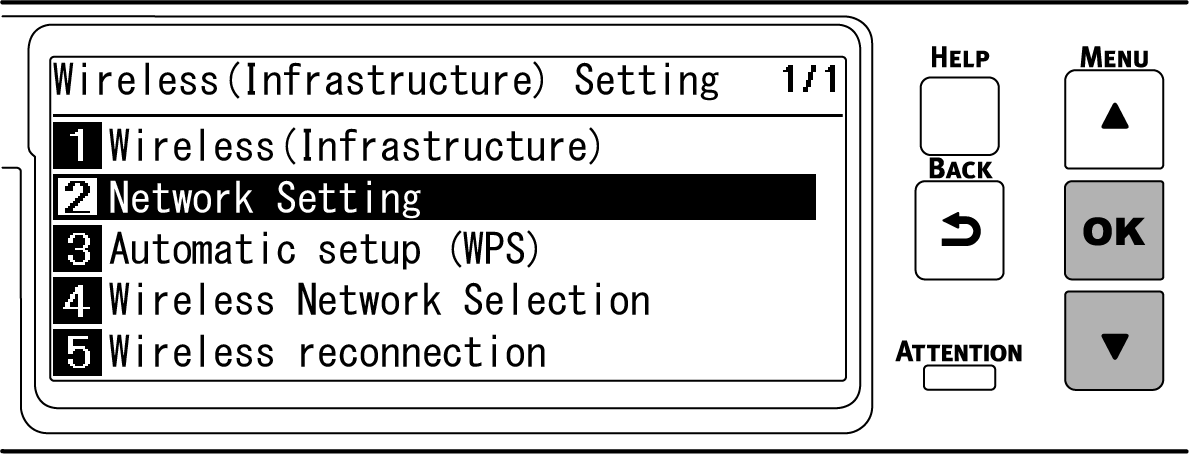
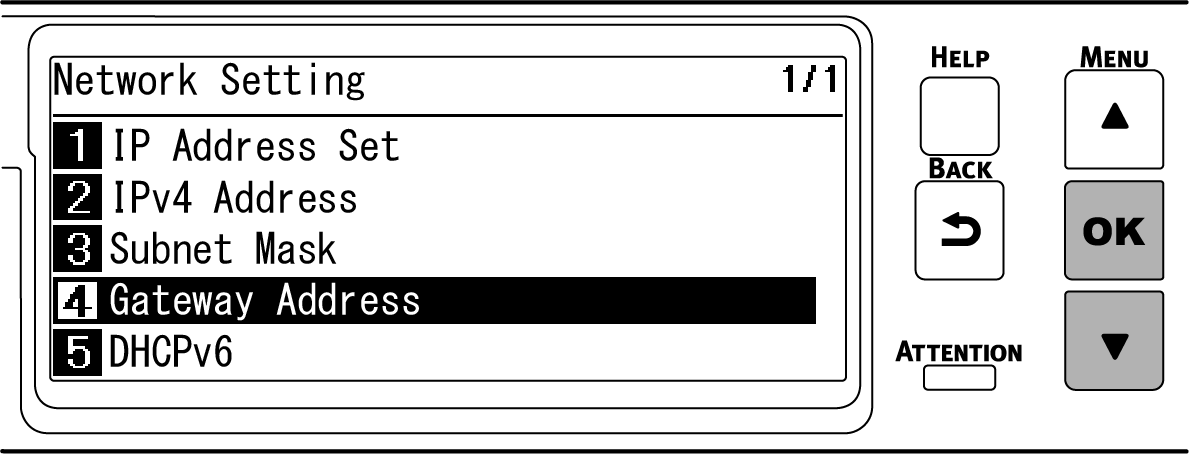
Press ▼ to select [Network Setting], and press «OK».
-
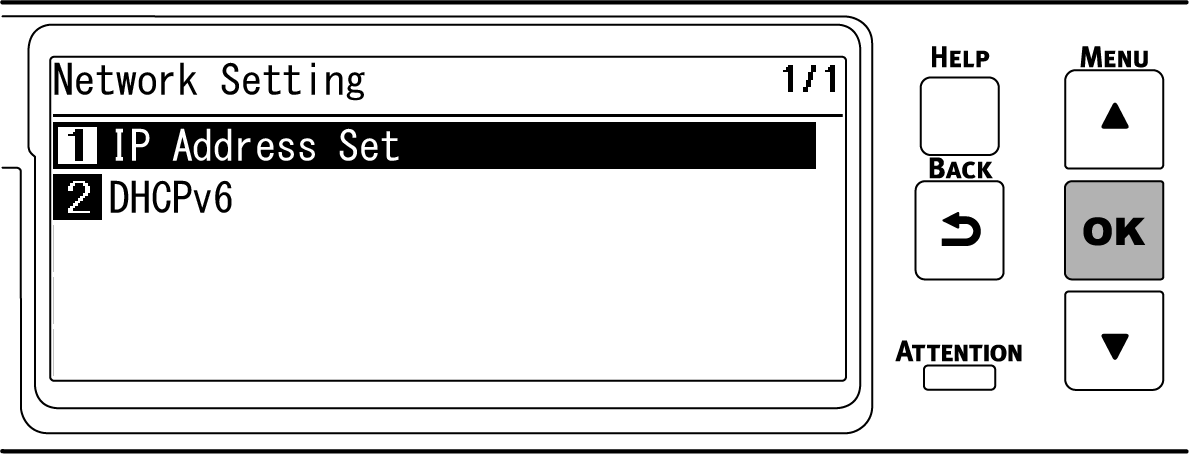
Check that [IP Address Set] is selected, and press «OK».
-
Press ▼ to select [Manual], and press «OK».
-
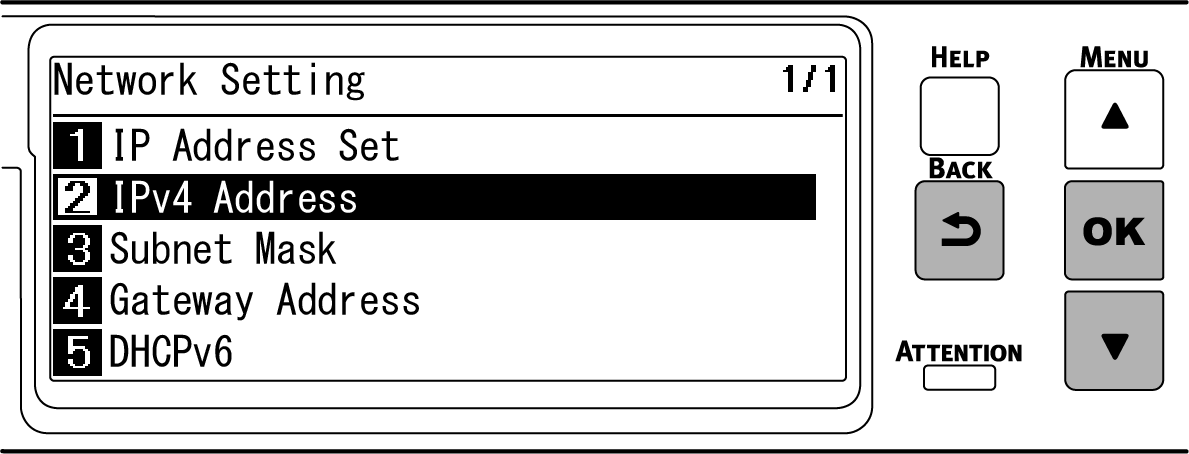
Press «BACK», then press ▼ to select [IPv4 Address] on the [Network Setting] screen, and finally press «OK».
-
Use either the scroll buttons or the numeric keypad to input the first 3 digits of the IP address, and press «OK».
Likewise, input the next 3 digits, and press «OK». Press «OK» after inputting all the digits.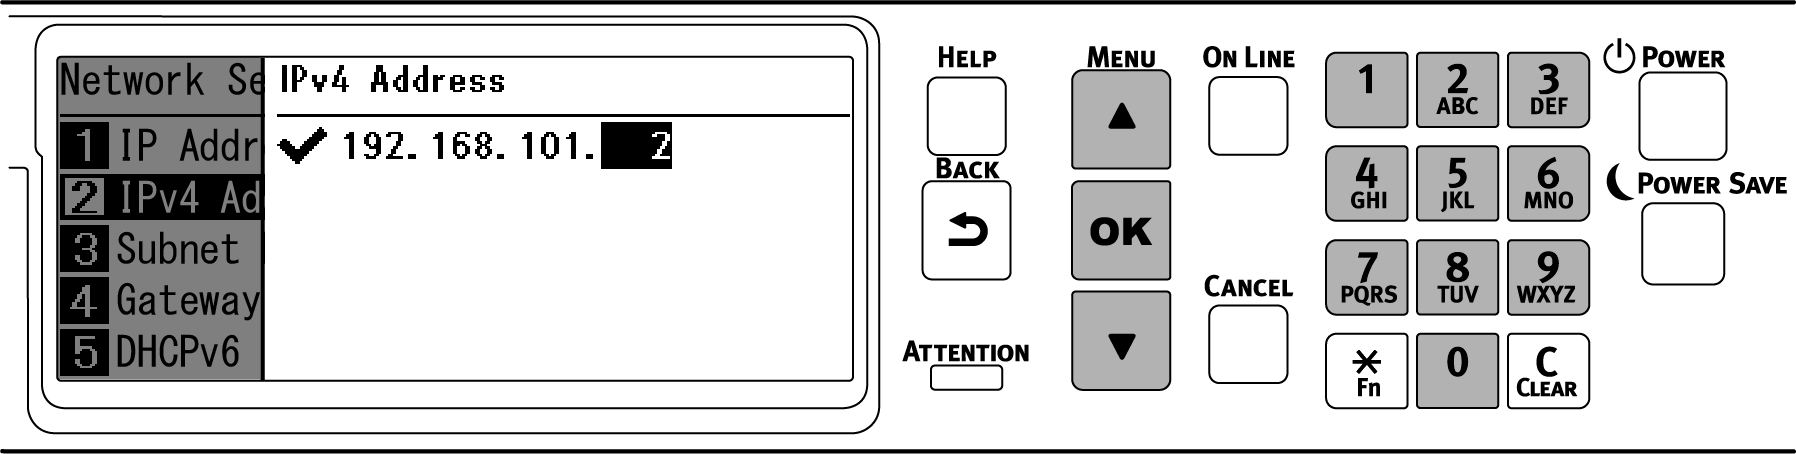
-
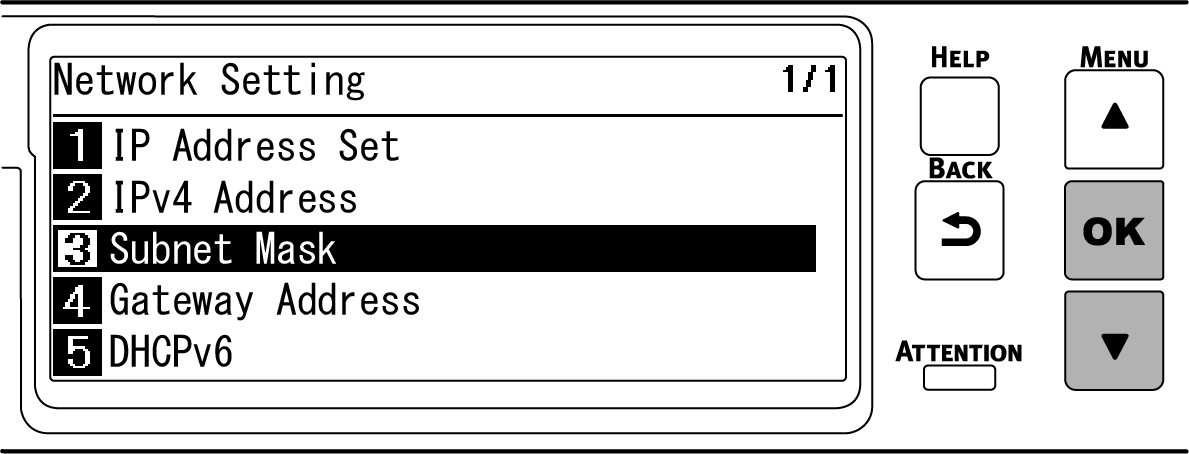
Press ▼ to select [Subnet Mask], and press «OK».
-
Input the subnet mask in the same way as the IP address. Press «OK» after inputting all the digits.
-
Press ▼ to select [Gateway Address], and press «OK».
-
Input the gateway address in the same way as the IP address. Press «OK» after inputting all the digits.
-
Press «ON LINE» to return to the standby screen.
4. Connecting with the wireless access point
There are three ways as follows. Usually, it is connected with the simplest WPS.
- Connecting with WPS
- Connecting by selecting a wireless LAN access point from the operator panel
-
Connecting by setting manually from the operator panel
![]()
- When you connect with wireless LAN by WPA/WPA2-EAP, see " Setting IEEE802.1X (Wireless LAN) ".
Connecting with WPS
If the wireless LAN access point supports WPS, you can easily connect to the wireless LAN using the push button for easy setup (WPS button).
- Check the position of push button for easy setup (WPS button) and the time for which the button is pressed in the User's Manual enclosed with the wireless LAN access point.
-
Check that the wireless LAN access point is activated and operating properly.
-
Press the scroll button ▲ on the operator panel several times to select [Wireless(Infrastructure) Setting], and press «OK».
-
Input the admin password using the numeric keypad, and press «OK».
- "It is not possible to use the wireless(AP Mode) at the same time." will be displayed for about 5 seconds.
-
Press ▲ to select [Enable], and press «OK».
-
Press ▼ several times to select [Automatic setup (WPS)], and press «OK».
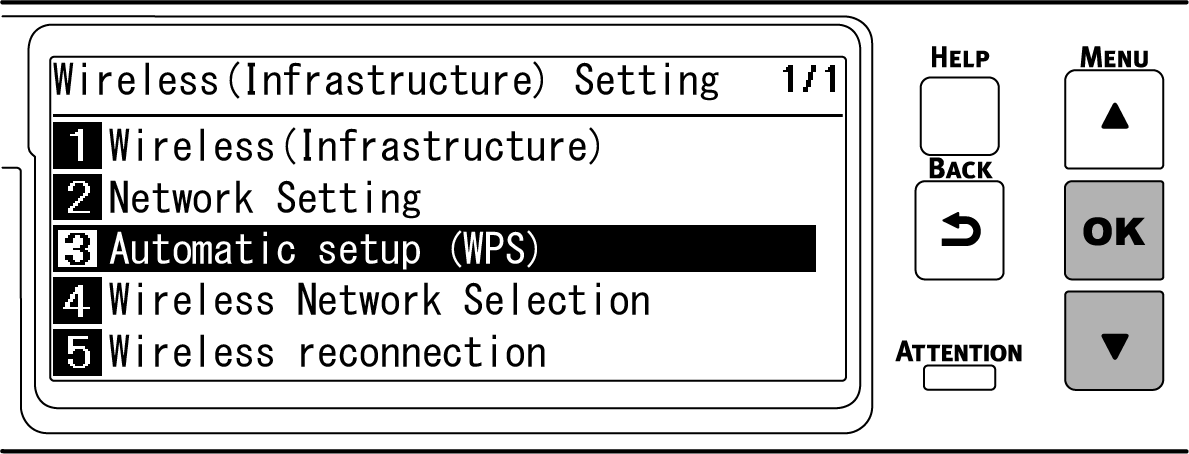
-
Check that [WPS-PBC] is selected, and press «OK».
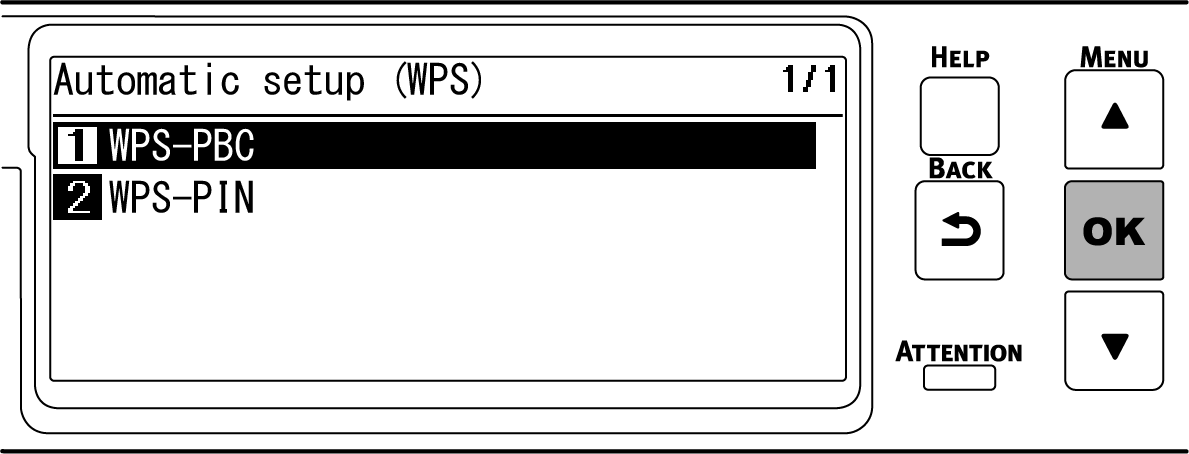
-
When "Implementing this method? Pushbutton method" is displayed, check that [Yes] is selected, and press «OK».

"Running pushbutton method" is displayed, and this machine will start to search for a wireless LAN access point.

-
Press and hold the push button of wireless LAN access point for the period of time confirmed in Step 1 or for a few seconds.

- "Running pushbutton method" is displayed for about 2 minutes. Press the push button of wireless LAN access point while it is displayed.
- While "Running pushbutton method" is displayed, the operator panel of this machine is disabled.
-
When "WPS connection successful" is displayed, the connection to the wireless LAN access point is completed.
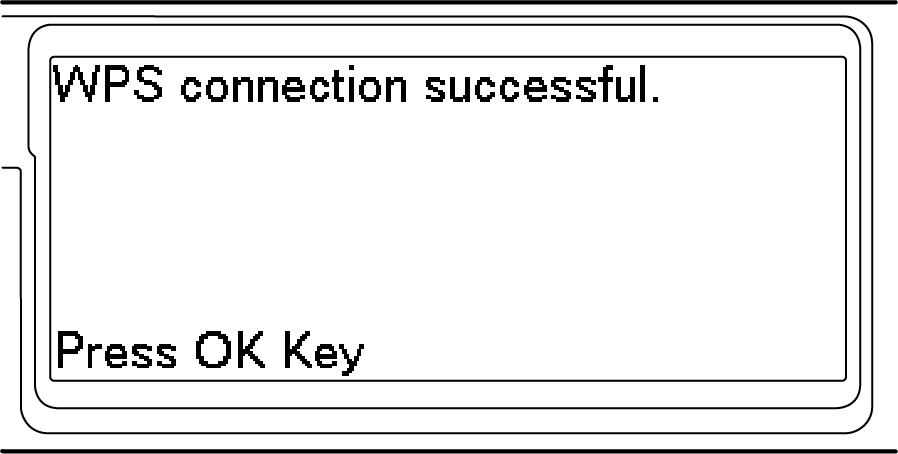
Go to " 6. Checking the connection from a PC ".
- When "Not connected to wireless access point" or "Connection failed." is displayed, repeat the procedure from Step 1, or try " Connecting by selecting a wireless LAN access point from the operator panel ".
Connecting by selecting a wireless LAN access point from the operator panel
When the wireless LAN access point does not support WPS or when WPS connection does not function well, connect by specifying the wireless access point to be used from the list of wireless access points detected by this machine. In this case, it is required to input the SSID and encryption key.
-
Check and take a note of the SSID and encryption key on the side of the wireless LAN access point or in the User's Manual enclosed with the access point.
-
WPA-EAP and WPA2-EAP cannot be set from the operator panel. Set them from the web page of this machine.
-
- Check that the wireless LAN access point is activated and operating properly.
- Press the scroll button ▼ on the operator panel several times to select [Wireless(Infrastructure) Setting], and press «OK».
-
Input the admin password using the numeric keypad, and press «OK».
- "It is not possible to use the wireless(AP Mode) at the same time." will be displayed for about 5 seconds.
-
Press ▲ to select [Enable], and press «OK».
-
Press ▼ several times to select [Wireless Network Selection], and press «OK».
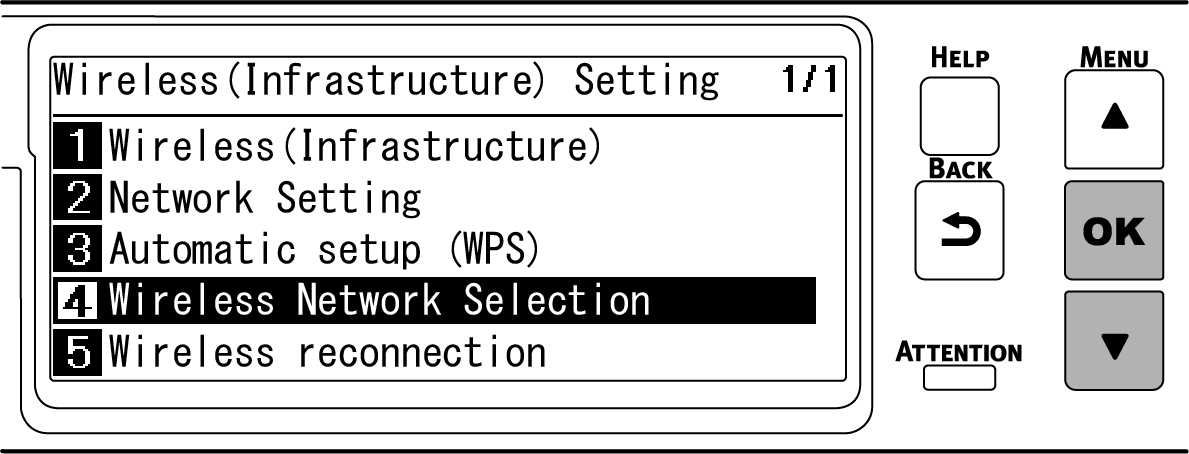
This machine starts searching for wireless LAN access points.
-
A list of SSID of connectible wireless LAN access points is displayed. Press ▲ or ▼ to select the SSID of the wireless LAN access point recorded in Step 1, and press «OK».
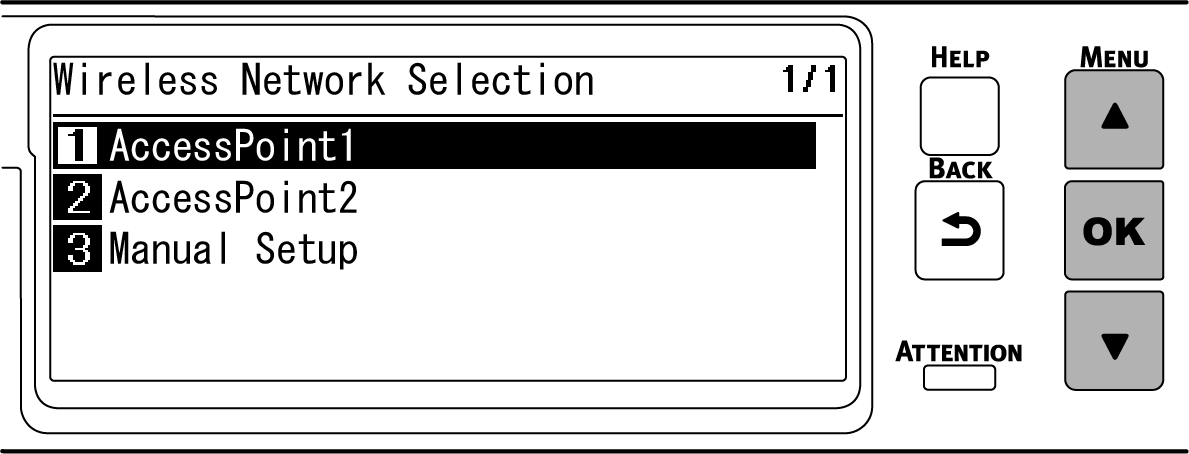
If no wireless LAN access point is found, only [Manual Setup] is displayed. In that case, make settings by following " Connecting by setting manually from the operator panel ".
-
When the encryption key entry screen suitable for the encryption method of the selected wireless LAN access point is displayed, input the encryption key recorded in Step 1, and press «OK».
- The encryption key varies with the wireless LAN access point and security method.
- When "WPA Pre-shared key" is displayed
Encryption method: WPA/WPA2-PSK or WPA2-PSK
Encryption key: Please input the WPA pre-shared key. - When "Please set in Web" is displayed
Encryption method: WPA/WPA2-EAP or WPA2-EAP
* Make settings from the web page of this machine. - When "WEP key" is displayed
Encryption method: WEP
Encryption key: Please input the WEP key. - In other cases
Encryption method: Disable
No need to input the encryption key.
- When "WPA Pre-shared key" is displayed
- The encryption key varies with the wireless LAN access point and security method.
-
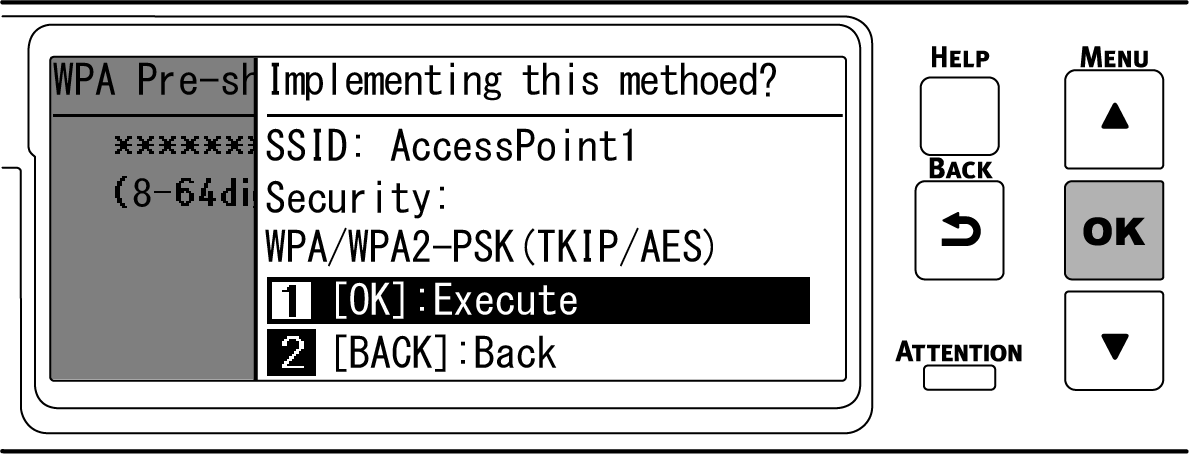
"Implementing this method?" is displayed, and the SSID selected in Step 7 from the confirmation screen and the encryption method input in Step 8 are displayed as the security method. If the SSID is the same as the one recorded in Step 1, press «OK».
-
When "Connection successful." is displayed, the connection to the wireless LAN access point is completed.

Go to " 6. Checking the connection from a PC ".
- When "Not connected to wireless access point" is displayed, repeat the procedure from Step 4, or try " Connecting by setting manually from the operator panel ".
Connecting by setting manually from the operator panel
Set the wireless LAN access point information (SSID, encryption method, encrypted key) manually, and connect to the wireless LAN.
-
Check and take a note of the SSID and encryption key on the wireless LAN access point or in the enclosed User's Manual.
-
WPA-EAP and WPA2-EAP cannot be set from the operator panel. Set them from the web page of this machine.
- SSID is also called the network name, ESSID or ESS-ID.
- Encryption key is also called the network key, security key, password, or pre-shared key (PSK).
-
- Check that the wireless LAN access point is activated and operating properly.
- Press the scroll button ▼ on the operator panel several times to select [Wireless(Infrastructure) Setting], and press «OK».
-
Input the admin password using the numeric keypad, and press «OK».
- "It is not possible to use the wireless(AP Mode) at the same time." will be displayed for about 5 seconds.
-
Press ▼ several times to select [Wireless Network Selection], and press «OK».
Start searching for wireless LAN access points. Please wait.
-
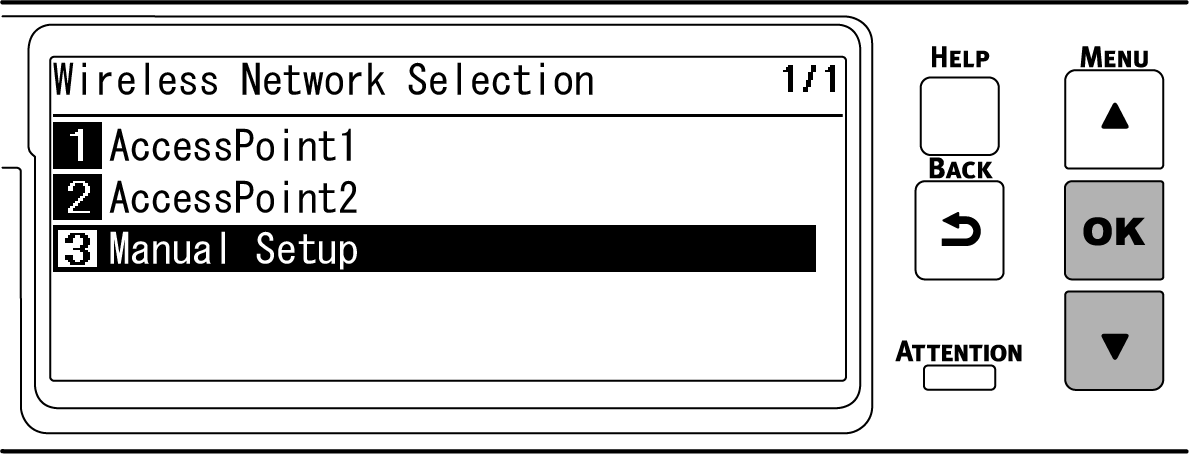
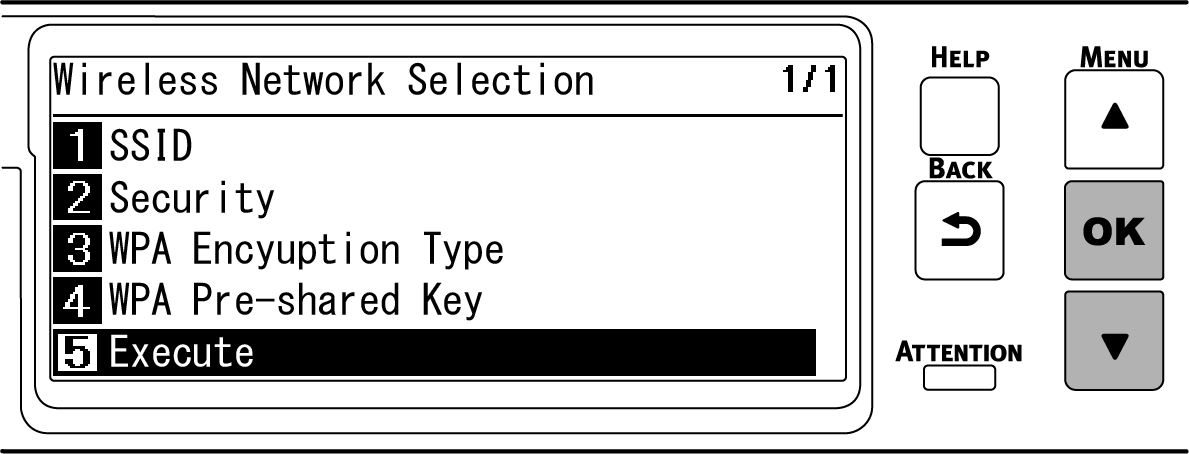
A list of SSID of connectible wireless LAN access points is displayed. Press ▼ several times to select [Manual Setup] at the end of the list, and press «OK».
-
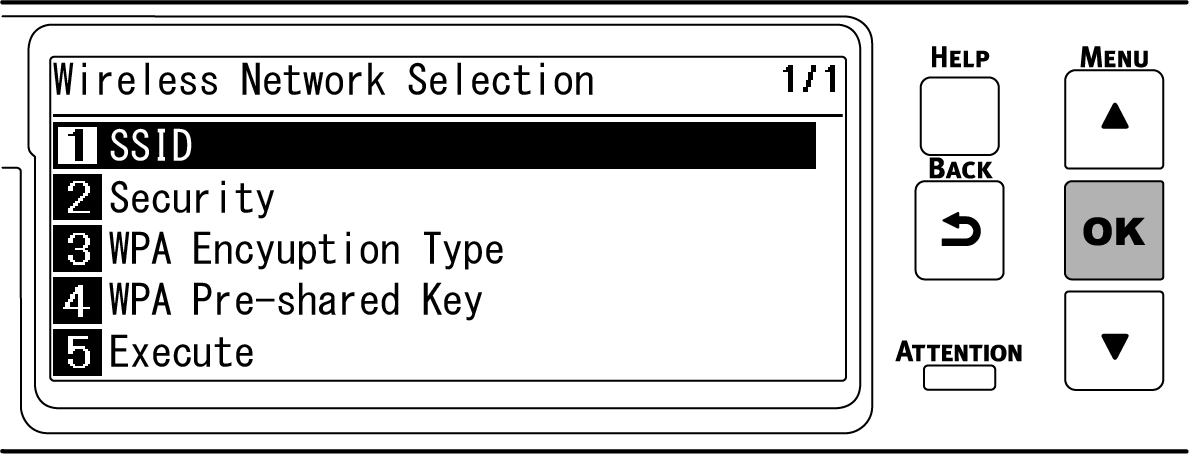
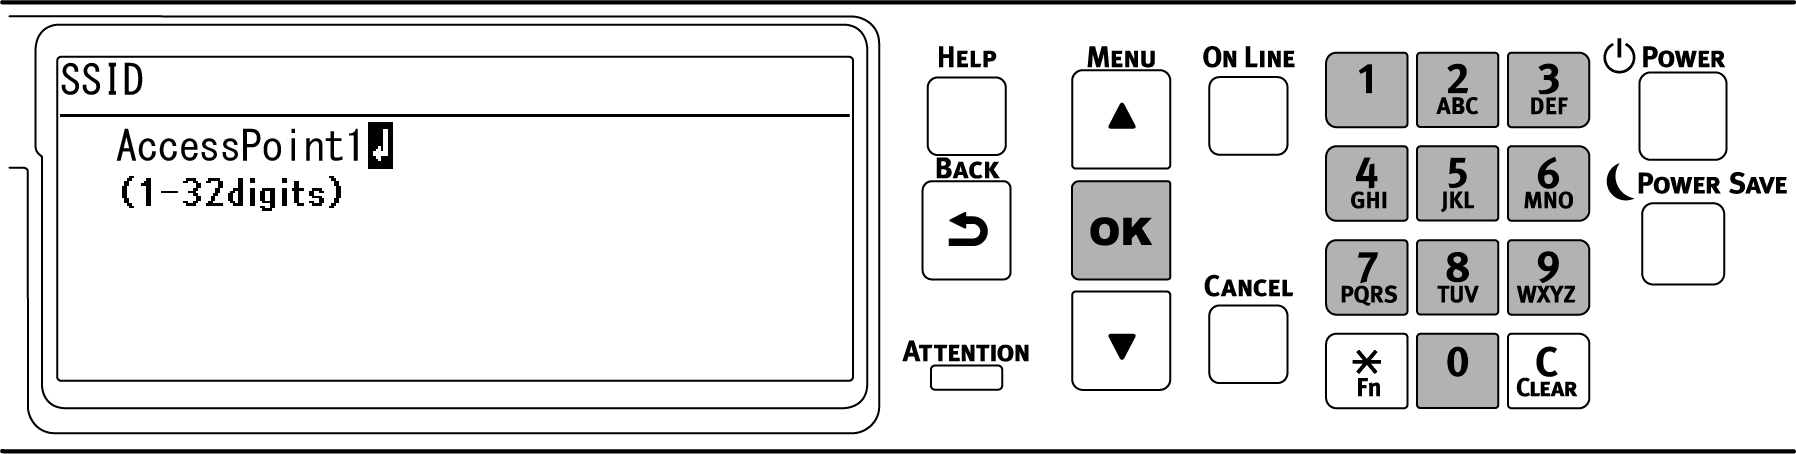
Check that [SSID] is selected, and press «OK».
-
Input the SSID recorded in Step 1, and press «OK».
-
Press ▼ to select [Security], and press «OK».
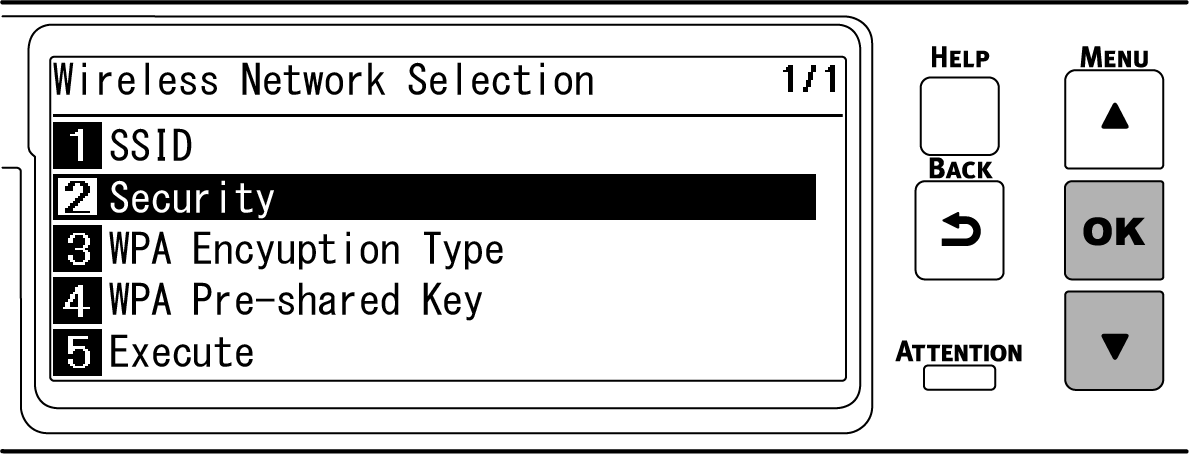
-
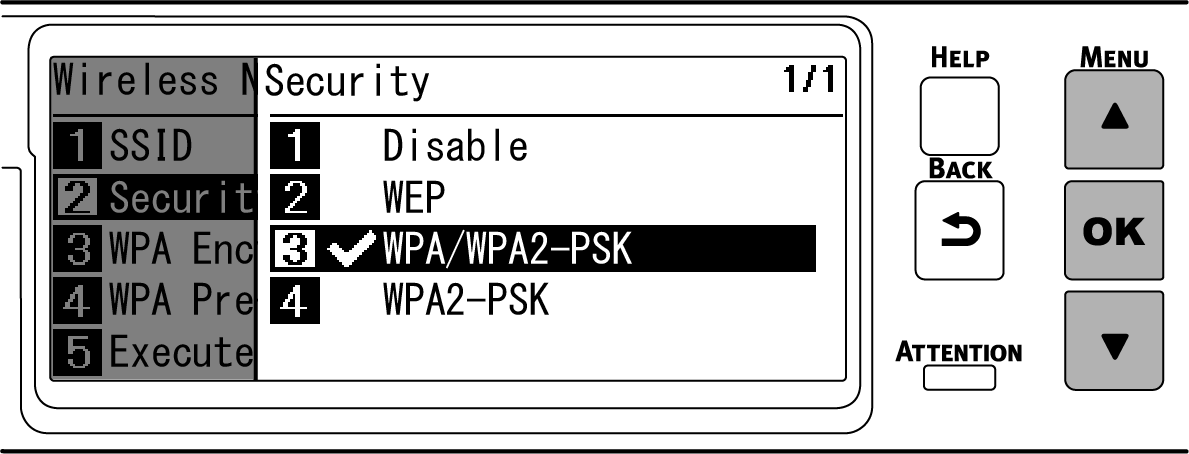
Select the encryption method recorded in Step 1, and press «OK».
-
Press ▼ to select [WPA Pre-shared Key], and press «OK».
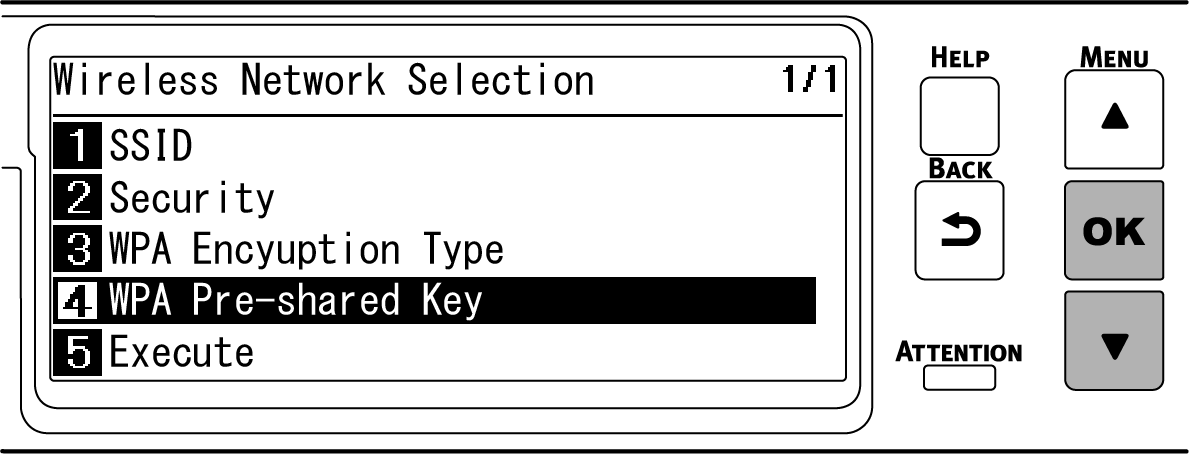
-
Input the encryption key recorded in Step 1, and press «OK».
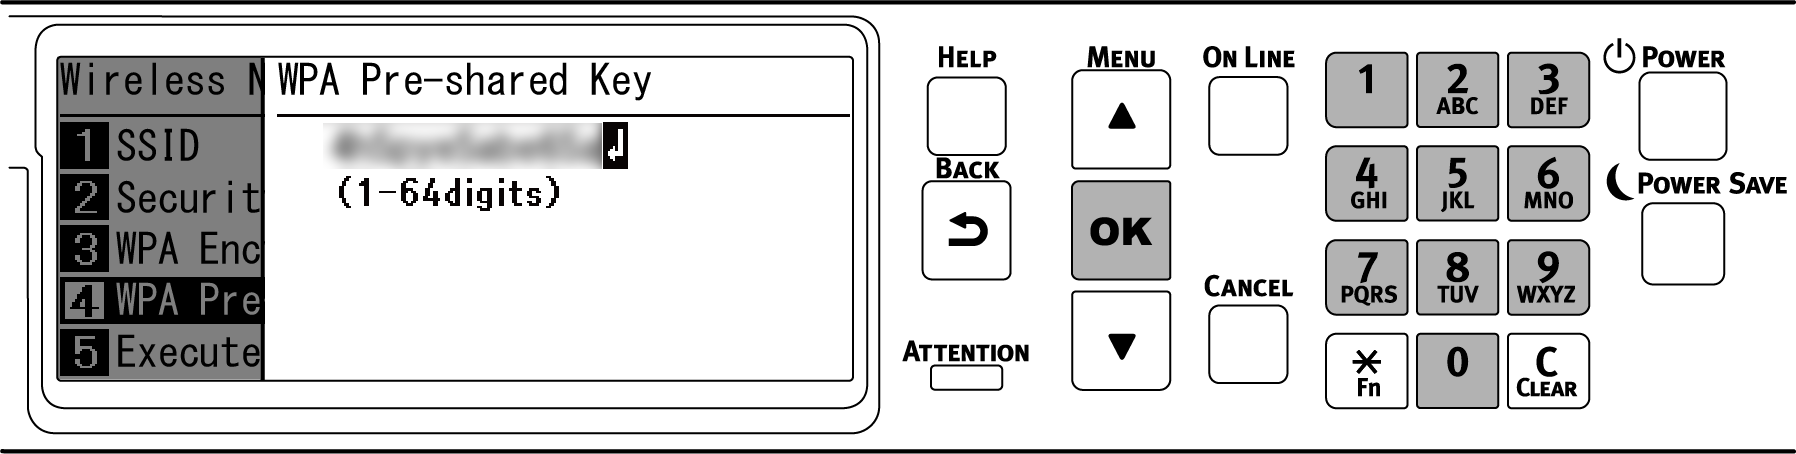
- The encryption key varies with the wireless LAN access point and security method.
-
Press ▼ to select [Execute], and press «OK».
-
"Implementing this method?" is displayed, and the SSID input in Step 8 and the encryption method selected in Step 10 are displayed as security on the confirmation screen. If the SSID is the same as the one recorded in Step 1, press «OK».

-
When "Connection successful." is displayed, the connection to the wireless LAN access point is completed.
Go to " 6. Checking the connection from a PC ".
- When "Not connected to wireless access point" is displayed, repeat the procedure from Step 4.
- If you cannot connect, see " Troubleshooting for wireless LAN connection ".
5. Choosing a valid default gateway
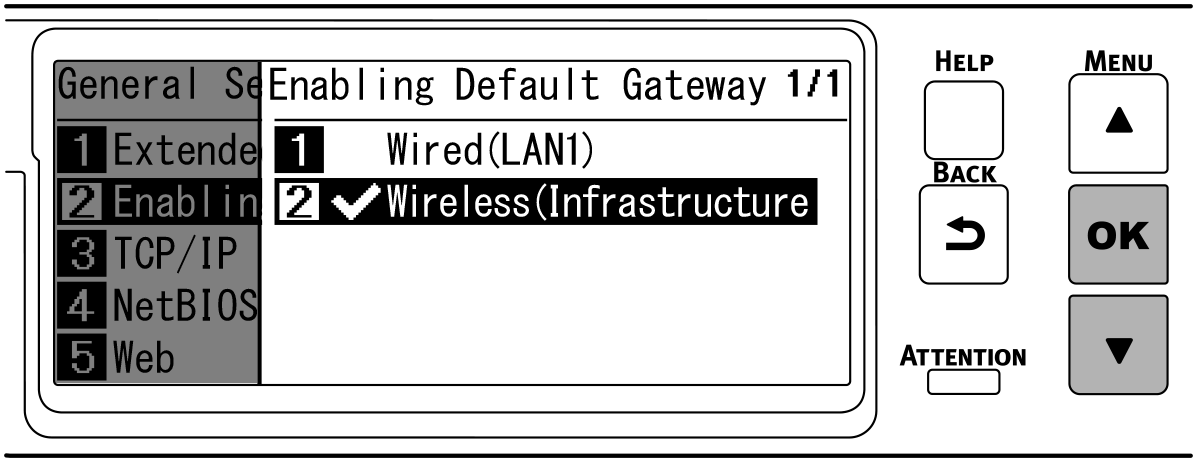
By default, [Enabling Default Gateway] is set to [Wired(LAN1)]. This machine can use a wired LAN and wireless LAN at the same time, but only either of them can be used to connect a terminal outside the segment (a different subnet).
When a wireless LAN (infrastructure) is used to communicate across segments, follow the following procedure to change into [Wireless(Infrastructure)].
-
Check that "Ready To Print" appears on the display.
- If the machine is in the power save mode, press «POWER SAVE» to restore.
- Press the scroll button ▼ on the operator panel several times to select [Admin Setup], and press «OK».
-
Input the admin password using the numeric keypad, and press «OK».
-
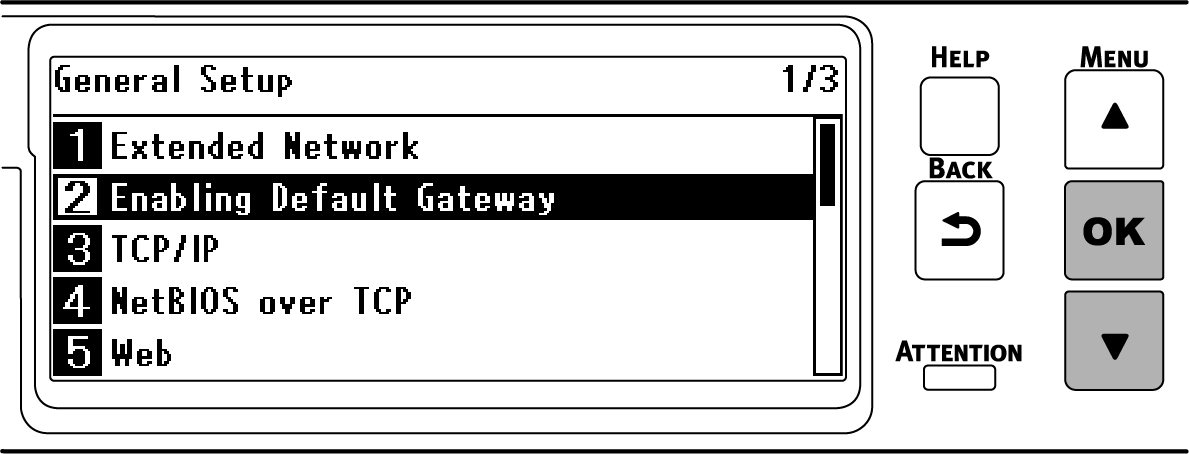
Check that [Network Setup] is selected, and press «OK».
-
Check that [General Setup] is selected, and press «OK».
-
Press ▼ to select [Enabling Default Gateway], and press «OK».
-
Press ▼ to select [Wireless(Infrastructure)], and press «OK».
-
Press «ON LINE» to return to the standby screen.
6. Checking the connection from a PC
Check the IP address of the device, and access it from a PC by using the Web browser.
-
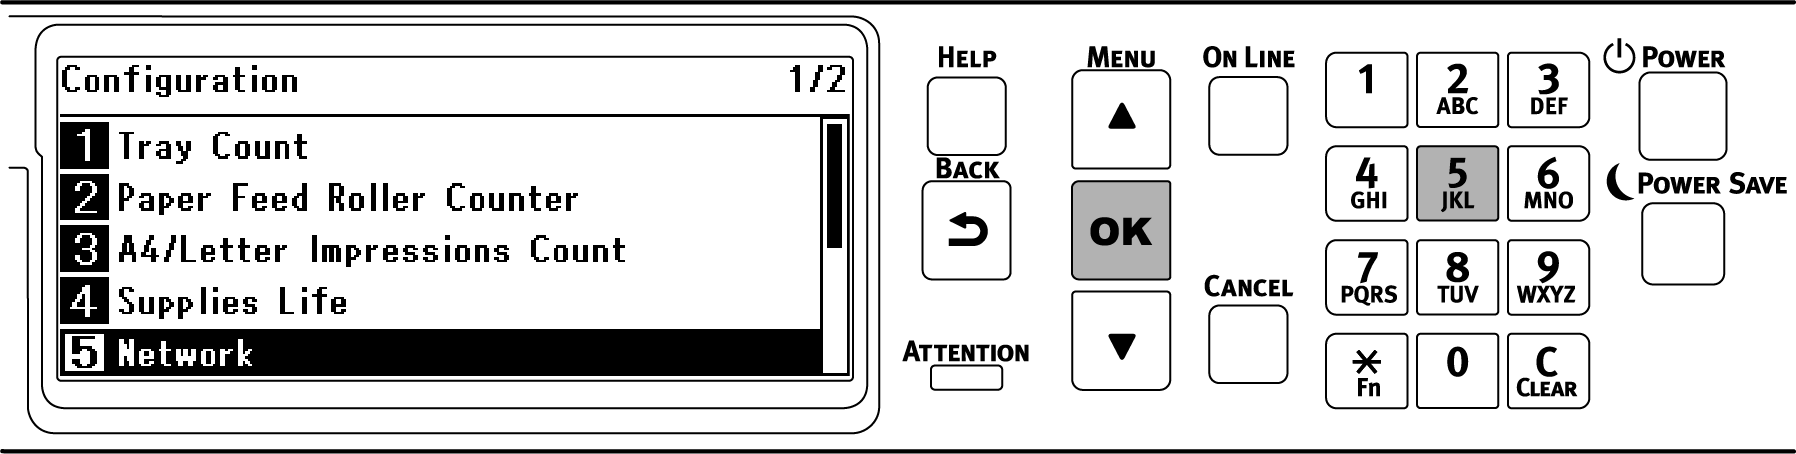
Press the scroll button ▼ on the operator panel several times to select [Configuration], and press «OK».
-
Press «5» on the [Configuration] screen.
-
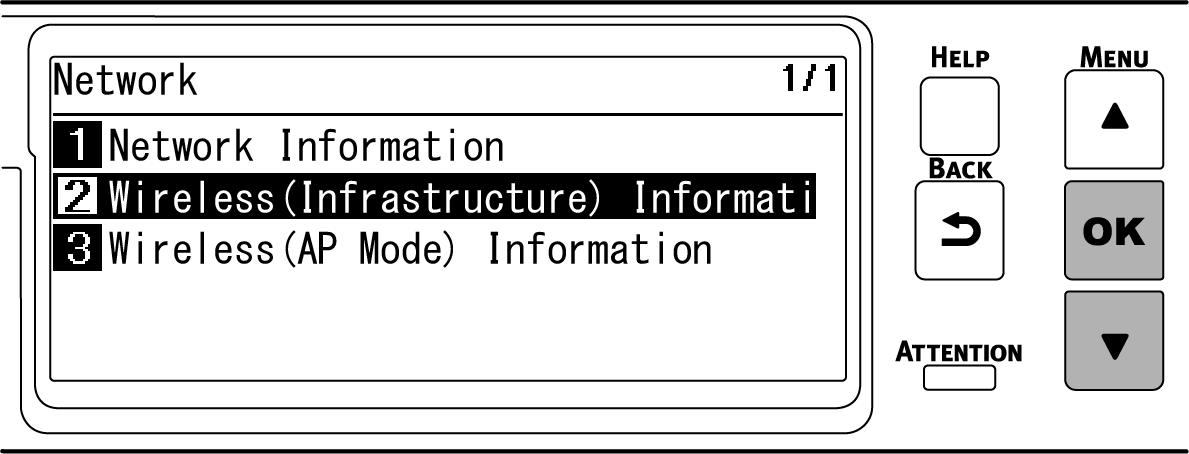
Press ▼ to select [Wireless(Infrastructure) Information], and press «OK».
-
Press ▼ several times to select [IPv4 Address], and press «OK».
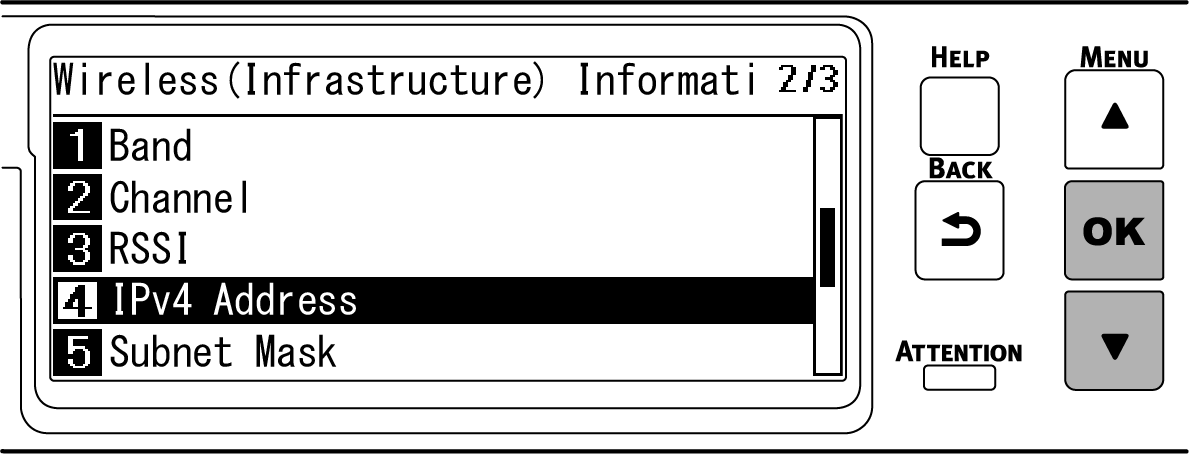
- Take a note of the displayed IP address.
-
Start the web browser in a PC.
-
Input "http:// (The IP address recorded in Step 5)", and press the «Enter» key.
Connection is successful when the web page of this machine is displayed.
- If the web page of this machine is not displayed, the network connection between the PC or other terminals and this machine has failed.
Check that [IP Address Set], [IPv4 Address], [Subnet Mask], [Gateway Address] and [Enabling Default Gateway] have been set correctly for this machine.
Then, go to " Installing software on a PC ".
When using a mobile device, go to " Printing from a mobile device ".
- If the web page of this machine is not displayed, the network connection between the PC or other terminals and this machine has failed.