
Printing from a PC
If access control is enabled, when printing from a PC, input user information in the printer driver to print.
For Windows
In this example, Notepad is used to print from the PCL driver.
- Select [Print] from the [File] menu.
- In [Select Printer], select the required printer driver, and click [Preferences].
- Select the [Extend] tab.
Click [User Authentication].
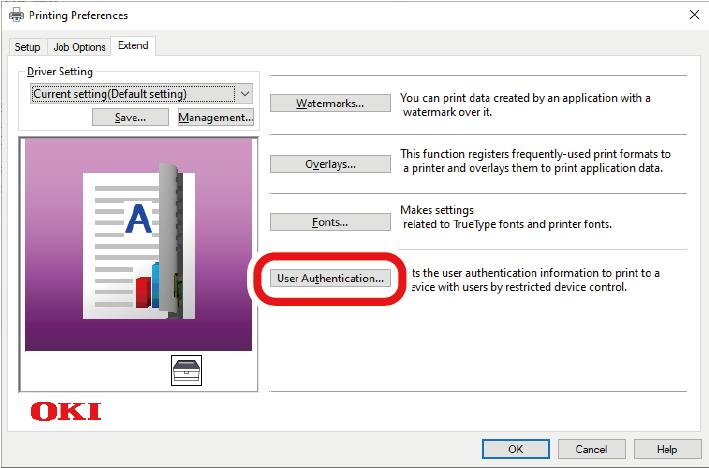
Set [User name] and [Password] of the user as user authentication information, and [Authentication Type] to specify the authentication destination and authentication mode of the user.

- [Password], [Authentication Type], and [Use User Authentication] may not be displayed in the screen depending on the setting of [User Authentication Options] in [Device Options] tab.
Check [Use User Authentication] if it is displayed.
- Uncheck [Use User Authentication] if the PIN of the job accounting client is used as user authentication information.
Input the user name and password.
The user name may be fixed as login name depending on the setting of [User Authentication Options] of the [Device Options] tab.
Check [Use logon name as user name] to use the Windows login name as the user name.- If [Authentication Type] is displayed, select the user's authentication destination and authentication mode from the list.
- Auto: Follows the method for logging into Windows. Authentication will be made by [Server LDAP] when you are logged into a domain or by [Device Local] when you are logged into a local PC.
- Device Local: Authenticates by the user information in this machine.
- Server LDAP: Authenticates by using LDAP in the user information of the server.
- Server Kerberos: Authenticates by using Kerberos in the user information of the server.
- The default authentication type can be set in [User Authentication Options] of the [Device Options] tab.
Click [OK].
Specify other settings as necessary, and click [OK].
Click [Print] in the [Print] screen.
Setting details of user authentication
Set the user authentication details of the printer driver from the [Device Options] tab or [Device Settings] tab of printer properties.
Open the "Devices and Printers".
- Right-click on the icon of [OKI C650*], and select [Printer properties].
* Driver types (e.g. PCL6/PS) - For the Windows PCL printer driver, select the [Device Options] tab, and click [User Authentication Options]. For the Windows PS printer driver, select the [Device Settings] tab, and expand [Installable Options].
- Set the details of user authentication.
Set User Authentication Options for Each User: Displays [Use User Authentication] on the user authentication settings screen so that you can set whether to use user authentication or not.
- When [Set User Authentication Options for each user] is unchecked, user authentication will be used, and authentication type will follow the method for logging into Windows. Authentication will be made by [Server LDAP] when you are logged into a domain or by [Device Local] when you are logged into a local PC.
- To use a PIN in the pop-up mode of the job accounting client as user authentication information, check [Set User Authentication Options for each user].
- Input user authentication information when printing:Pops up user authentication settings for each print job. Use this option to specify an actual user for each print job in an environment where multiple users use the same login account on the same PC.
This cannot be set if [Set User Authentication Options for each user] is checked. - Authentication Type: Sets the authentication type in user authentication settings.
- Default Authentication Type: Specifies the default authentication type if the authentication type cannot be set.
- For the Windows PCL printer driver, click [OK].
- Click [OK].
For macOS
Here is an example with Text Edit.
- Select [Print] from the [File] menu.
- Select the printer driver for this machine.
- Select [User Authentication] from the panel menu.
Check [Use User Authentication].
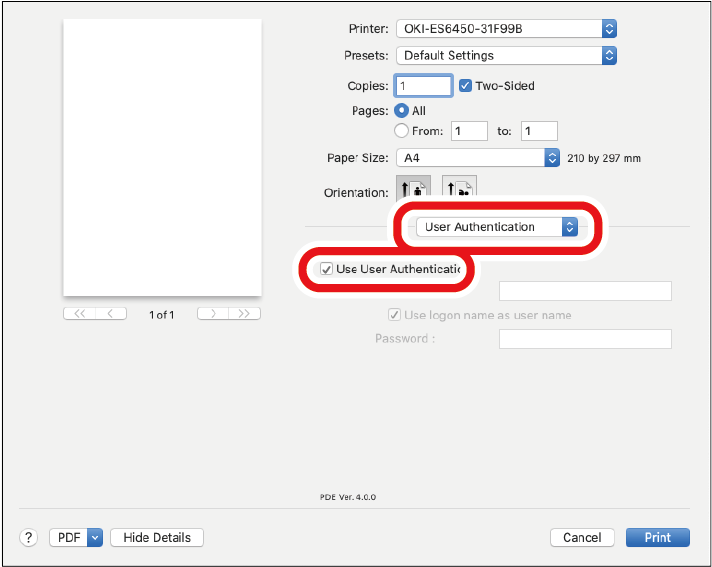
- Uncheck [Use User Authentication] if the PIN of the job accounting client is used as user authentication information.
- Input [User name] and [Password].
Check [Use logon name as user name] to use the login name as the user name. - If [Authentication Type] is displayed, select the user's authentication destination and authentication mode from the list.
- Auto: Follows the method for logging into macOS. Authentication will be made by [Server LDAP] when you are logged into to a domain or by [Device Local] when you are not logged into a domain.
- Device Local: Authenticates by the user information in this machine.
- Server LDAP: Authenticates by using LDAP in the user information of the server.
- Server Kerberos: Authenticates by using Kerberos in the user information of the server.
- Make settings required for printing.
- Click [Print].
When using authentication type
- Select [System Preferences] from the Apple menu.
- Click [Printers & Scanners].
- Select this machine, and click [Options and Supplies].
- Check the function to be used in the [Options] tab.
- Specify the default authentication type, and click [OK].