
Correcting the print position of the tray
You can correct the print start position vertically and horizontally on paper for each tray. Set the correction volume in increments of 0.25 mm on the operator panel.
[X Adjust] and [Y Adjust] correct the simplex printing and the back side (the printing side fed from the tray) of duplex printing.
[Duplex X Adjust] and [Duplex Y Adjust] correct the face side (the printing side fed from the duplex unit) of duplex printing.
![]()
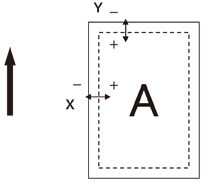
- The thick arrows in the figure indicate the paper feed direction.
- X indicates the vertical direction of paper travel, and Y the horizontal direction of paper travel.
- Correct with [+] to widen the blank space in the X direction, and [+] to widen the blank space in the Y direction.
- Readjustment might be necessary depending on the usage conditions (temperature and humidity/media type).
- This function corrects the position and does not improve the writing start position (±2mm).
![]()
- The corresponding function numbers for each tray are listed below.
Target tray | Function number |
|---|---|
Multi-purpose tray (MP tray) | 220 |
Tray 1 | 221 |
Tray 2 | 222 |
Tray 3 | 223 |
Tray 4 | 224 |
Check that "Ready To Print" appears on the display.

- If the machine is in the power save mode, press «POWER SAVE» to restore.
- Press «Fn» on the operator panel.
When the function number screen is displayed, press the function number of the tray you want to correct, and then press «OK».
- Press the scroll button ▲ or ▼ to select the time to correct.
- Press «OK».
- Press ▲ or ▼ to select the correction volume, and press «OK». Make sure that a check is displayed to the left of the selected value.
- Press «ON LINE» to return to the standby screen.