
Preparations (For the administrator)
Before using the access control function, the device administrator shall prepare the following on the web page of this machine.
Register a role to set which operations are permitted or prohibited.
There are two methods for user authentication: Local Authentication (using user information registered with this machine) and server authentication (using user information registered with the server).
If you use the local authentication method for user authentication, register users and groups.
![]()
User registration can also be performed using the Configuration Tool.
If you use server authentication for user authentication, configure server authentication settings.
After registering users and configuring server authentication, enable the access control function.
Registering a role
Register a role to assign to the user. For example, create an organizational unit name or job title role, and set and register the allowed operations (like printing) for each role.
A maximum of 100 roles can be registered. You can also assign multiple roles to a single user.
You can set to permit/prohibit the following operations for a role.
- Printing from a PC
- Printing from a USB memory
By default, two types of roles are registered.
- .AdminRole:
The role of the device administrator. It can be assigned to general users. A user with [.AdminRole] assigned can act as a device administrator and perform [Administrator Login] on the web page. (However, the condition is that access control is enabled and it is a local user.)
[.AdminRole] cannot be deleted or edited. - .DefaultRole:
This is the role to be assigned if no role is specified when a user is registered.
[.DefaultRole] cannot be deleted, but the access rights can be edited.
Open the web page of this machine.
Log in as an administrator.
Click [User Management].
Click [Role List].
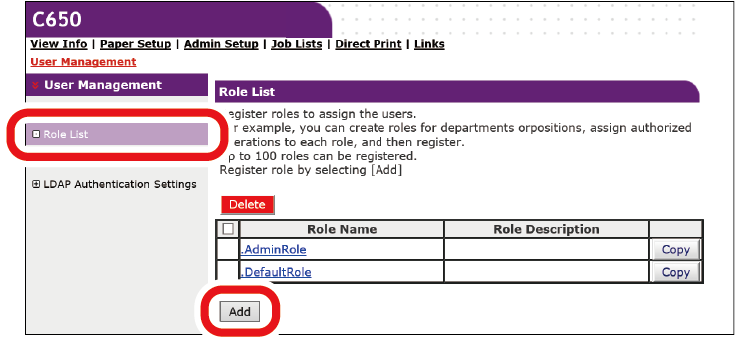
Click [Add].
When the Role Information screen is displayed, input the required information.
Role Name: Input any role name. The same [Role Name] cannot be registered. Also, [Role Name] cannot be omitted.
Role Description: Input a description for the role.
Permission: Set permission/prohibition/forced prohibition of each operation in this role. Setting forced prohibition will prohibit operations permitted by other roles.
Local User List: Add or delete a local user to which this role is assigned.
Kerberos User List: Add a Kerberos user to whom this role applies.
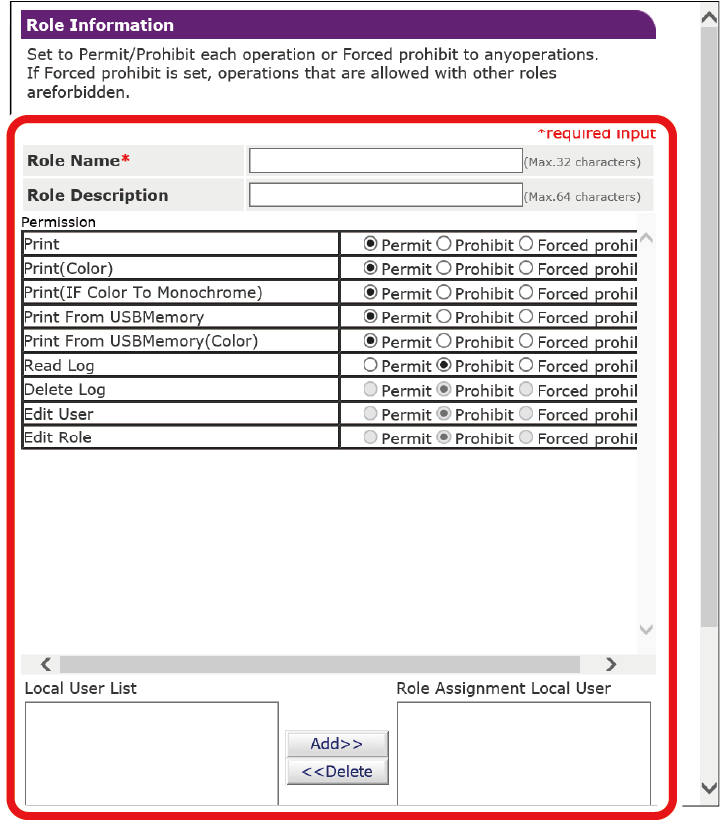
Click [Submit].
You can copy registered roles and add new roles based on the copied configuration.
When you click [Copy] to the right of the role name, the role information screen will be displayed, so change and register the required items.
Registering a user
When performing user authentication using the local confirmation method, register the user on this machine from the web browser. A maximum of 5,000 users can be registered.
Open the web page of this machine.
Log in as an administrator.
- Click [User Management].
- Click [User List].
- Set the type of user.
- Local User: Registers user information on this machine.
- LDAP User: A user registered in the LDAP server.
LDAP server authentication setting is required. LDAP user cannot be registered.
Only reference is possible. You can check the users who used this machine. - Kerberos User: A user registered in the Kerberos server.
Kerberos server authentication setting is required. Kerberos user cannot be registered. Only reference is possible.
You can check the list of users who used this machine. You can also assign a role to a Kerberos user.
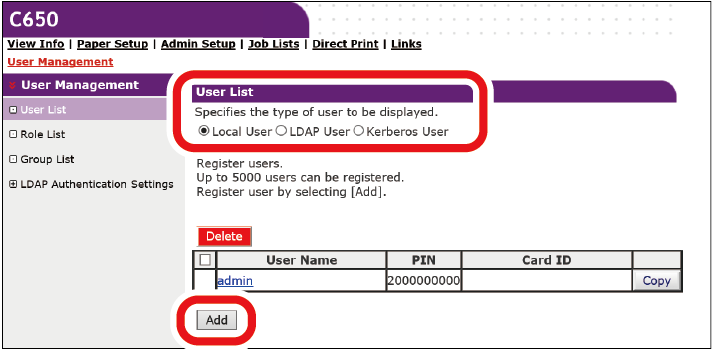
- Click [Add].
- When the User Information Settings screen is displayed, input the required information.
- User Name: Input the user name. The same [User Name] can not be registered. Be sure to set it.
- Password: Input the password. Be sure to set it.
- Display Name: Input the display name.
- E-mail address: Input the user's e-mail address.
- Language Code: Input the language code.
- PIN: Input the user's PIN.
- Card ID: Input the user's IC card information.
- Role: Set the user's role. [Role] can be assigned to multiple users.
- Group: Set the group to which the user belongs.
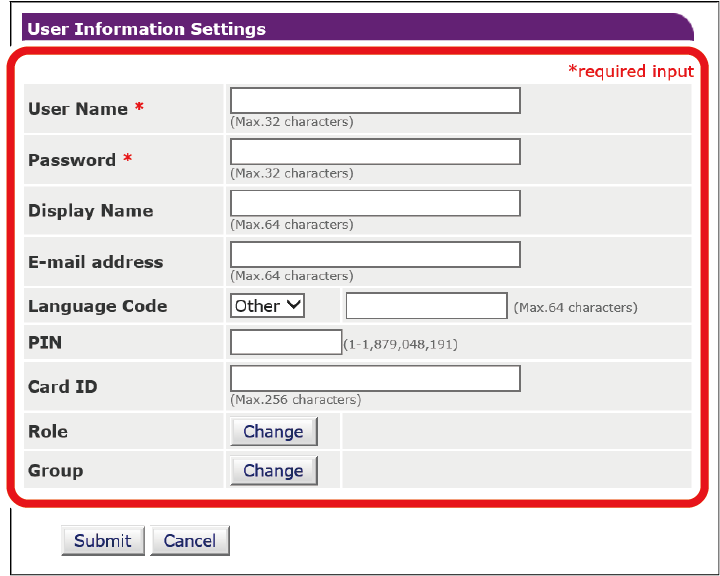
- Click [Submit].
You can copy registered roles and add new users based on the copied settings.
When you click [Copy] to the right of the user name, the user information screen will be displayed, so change and register the required items.
Registering a group
Users registered in this machine can be managed in a group. Up to 1,000 groups can be registered. Up to 5,000 users can be registered in one group.
Open the web page of this machine.
Log in as an administrator.
- Click [User Management].
Click [Group List].
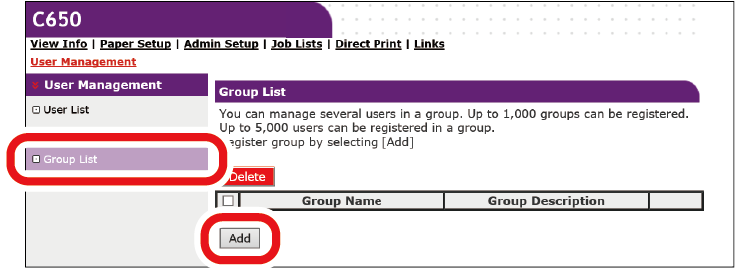
- Click [+].
- When the Group Information screen is displayed, input the required information.
- Group Name: Input any group name. Be sure to set it.
- Group Description: Input a description for the group.
- Local User List: Set the user you want to assign to this group.
- Kerberos User List: Set the Kerberos user you want to assign to this group.
- Click [Submit].
You can copy already registered groups and add new groups based on the copied settings.
When you click [Copy] to the right of the group name, the group information screen will be displayed, so change and register the required items.
Setting authentication server
When performing user authentication using the server authentication method, set the server settings from the web browser.
Here is an example of using an LDAP authentication server.
Open the web page of this machine.
Log in as an administrator.
- Click [User Management].
- Click [LDAP Authentication Settings].
- Click [LDAP Authentication Settings].
- Create user information based on the LDAP server information.
Input the LDAP key from which each value is obtained.- Display name: Set the LDAP key to obtain the display name of user information.
- Mail address: Set the LDAP key to obtain the E-mail address of user information.
- Language code: Set the LDAP key to obtain the language code of user information.
- Group: Set to assign users to a group automatically. Set the LDAP key to obtain the assigned group name. When a group with a group name defined by the same text string as the acquired text exists in this machine, each group is assigned. When it does not exist, a group with the group name of acquired text string is automatically created and assigned.
- Card ID: Set the LDAP key to acquire a card ID to use for the IC card authentication. When not using IC card authentication, you do not need to input anything.
- PIN: Set the LDAP key to to acquire the PIN to use for PIN authentication. If you do not use PIN authentication, you do not need to input anything.
- User Name: Set the LDAP key of the user name registered in the LDAP server.
The default value for user name is the LDAP key "sAMAccountName" for a Windows server.
Users using a Windows server do not need to change this setting. - Cache authentication information: Set whether authentication information is temporarily stored in this machine. The factory default setting is [Disable] (Do not save temporarily). When [Enable] is set, user authentication can be performed even when communication with the LDAP authentication server is not available due to a communication breakdown, etc., so this machine can be used continuously.
Validity period of cache authentication information: Displayed when [Cache authentication information] is set to [Enable]. Set the validity period of the temporarily saved authentication information in this machine on a daily basis. The setting range is 1 to 2000 days. After the set number of days, authentication with temporarily stored information will not be available any more.
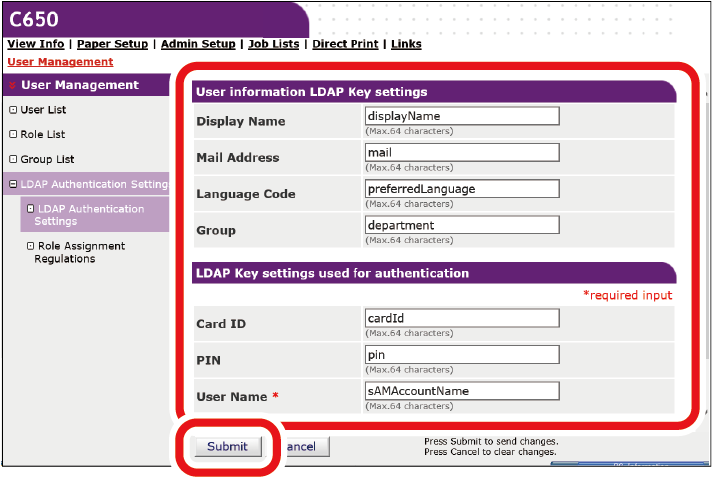
- Click [Submit].
Click [Role Assignment Regulations].
Define regulations for automatically assigning roles to LDAP users.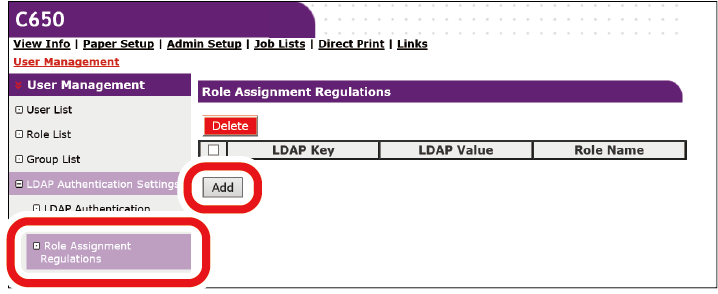
- Click [Add] to add new role assignment regulations.
- When the role assignment screen is displayed, input the LDAP key, the LDAP value and the applicable role.
When the LDAP value which is registered in the role assignment regulations of the user, and the LDAP value defined by the regulations are identified at the time of authentication, apply the role which is defined by each role assignment regulation to each user.
When a single user matches multiple role assignment regulations, all the roles which match those regulations are applied to the user. - Click [Submit].
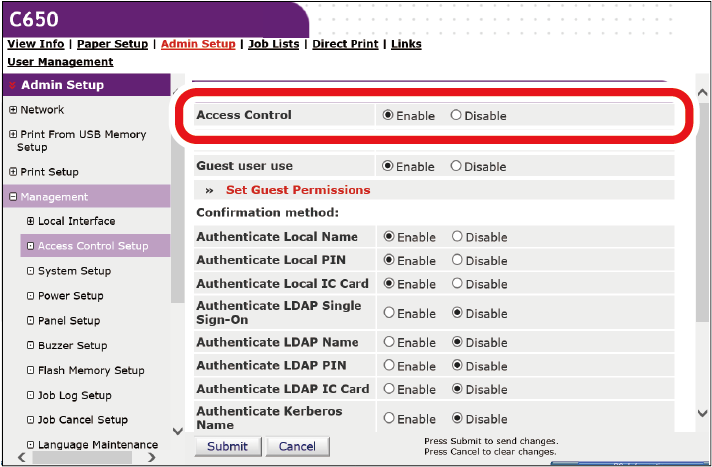
Enabling access control
After registering users and configuring the authentication server, enable access control.
Open the web page of this machine.
Log in as an administrator.
- Click [Admin Setup].
- Click [Management].
Click [Access Control Setup].
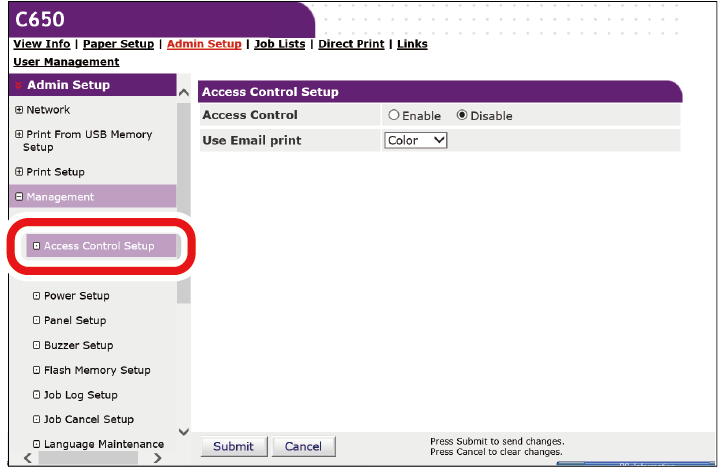
Select [Enable] in [Access Control].
- Configure access control settings according to your environment.
- Use Email print: Set to [Color], [Mono], or [Disable].
When [Color] is set, printing is performed according to the color settings of the received attached file.
When [Mono] is set, the received attached file is printed either in color or monochrome.
When [Disable] is set, the attached file received by the E-mail printing function will not be printed. - Guest user use: Guest is a user assigned to those who are not successful with user authentication when the access control is enabled.
This setting is used to enable or disable the use of this machine by guest.
When [Disable] is set, you can limit the use of this machine by users who failed the user authentication. Specifically, you can disable printing by users who failed the user authentication and the operation of the operator panel.
When [Enable] is set, you can allow users who failed the user authentication to use this machine within the range of guest permissions. The definition of guest permissions can be set in the guest permission settings.
[Guest] is displayed as the authentication method on the login screen. - Set Guest Permissions: The screen for setting the permissions for guest authentication is displayed. By default, guest access rights are granted for all operations. You can define guest permissions according to your security policy.
- Authentication method: Enable/Disable each authentication method.
A user can select the authentication method within the range granted by the administrator at the time of authentication.
If an unnecessary authentication method is disabled in this setting, the disabled authentication method will not be displayed in the user options. - Authentication Setting: Set the authentication method for logging into this machine or printing.
Default authentication method: Define the focused authentication method as default when the user calls the authentication screen from the operator panel.
Register general user's IC card: You can set whether to allow local users who are not administrator to register their own IC cards. When enabled, any user who logged on the operator panel without using IC card can register their own IC cards via the IC card reader on this machine. An administrator can start the IC card authentication by giving the IC card to the user after he/she has received the IC card.
Card read settings: Set to authenticate users with the FeliCa card.

- If you want to discard print data that cannot be authenticated, set [Guest user use] to [Disable], or set [Set Guest Permissions] to prohibit the printing permission of the guest.
- Use Email print: Set to [Color], [Mono], or [Disable].
Click [Submit].
- A card authentication kit (optional) is required to use IC card authentication. If the card authentication kit is not installed, "Auth By IC Card Avail" will not be displayed.