
3. Setting the IP address
If you want to set the machine's IP address to a fixed value, follow the procedure below.
![]()
- For [Auto], the machine's IP address may change dynamically.
![]()
- For [IPv4 Address], set a value which is not overlapped to any other networked machines.
- If you do not use the IPv6 address, set [DHCPv6] to [Disable].
(Example)
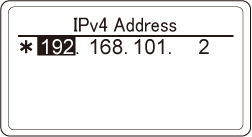
- IP address of this machine: 192.168.101.2
- Subnet mask: 255.255.255.0
- Gateway address: 192.168.101.1
- Press the scroll button ▼ on the operator panel several times to select [Wireless(Infrastructure) Setting], and press «OK».
Press ▲ or ▼ to input the admin password, and press «OK».

- "It is not possible to use the Wireless(AP Mode) at the same time." will be displayed for about 5 seconds.
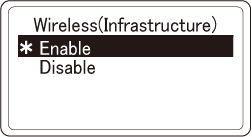
Press ▲ to select [Enable], and press «OK».
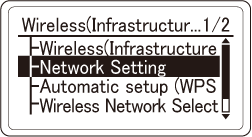
Press ▼ to select [Network Setting], and press «OK».
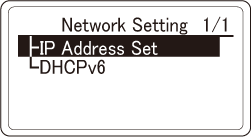
Check that [IP Address Set] is selected, and press «OK».
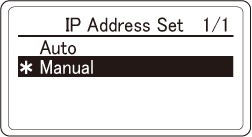
Press ▼ to select [Manual], and press «OK».
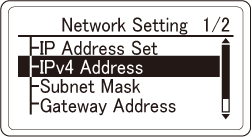
Press «BACK», then press ▼ to select [IPv4 Address] on the [Network Setting] screen, and finally press «OK».
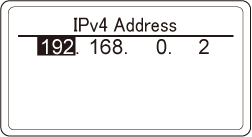
Since the first digit of the IP address is selected, press ▲ or ▼ to select the value to be set and then press «OK».
When the cursor moves to the next digit, follow the same procedure to set the value.
After all the values have been input, the cursor will return to the first digit. Check that [*] is displayed to the left of the set value, and then press «BACK».
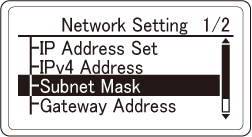
Press ▼ to select [Subnet Mask], and press «OK».
Set the subnet mask in the same way as the IP address. After all the digits have been set, the cursor will return to the first digit. Check that [*] is displayed to the left of the set value, and then press «BACK».

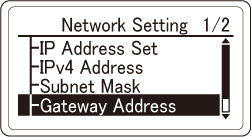
Press ▼ to select [Gateway Address], and press «OK».
Set the gateway address in the same way as the IP address. After all the digits have been set, the cursor will return to the first digit. Check that [*] is displayed to the left of the set value, and then press «BACK».

- Press «CANCEL» to return to the standby screen.