
4. Setting authentication server
When performing user authentication using the server authentication method, set the server settings from the web browser.
Here is an example of using an LDAP authentication server.
Open the web page of this machine.
Log in as an administrator.
- Click [Printer Settings].
- Click the Menu button on the upper right corner, and then select [User Management] - [LDAP Authentication].
- Create user information based on the LDAP server information.
Input the LDAP key from which each value is obtained.- Display name: Set the LDAP key to obtain the display name of user information.
- E-mail address: Set the LDAP key to obtain the E-mail address of user information.
- Language Code: Set the LDAP key to obtain the language code of user information.
- Group: Set to assign users to a group automatically. Set the LDAP key to obtain the assigned group name. When a group with a group name defined by the same text string as the acquired text exists in this machine, each group is assigned. When it does not exist, a group with the group name of acquired text string is automatically created and assigned.
- PIN: Set the LDAP key to acquire the PIN to use for PIN authentication. If you do not use PIN authentication, you do not need to input anything.
- User Name: Set the LDAP key of the user name registered in the LDAP server.
The default value for user name is the LDAP key "sAMAccountName" for a Windows server.
Users using a Windows server do not need to change this setting. - Cache authentication information: Set whether authentication information is temporarily stored in this machine. The factory default setting is [Disable] (Do not save temporarily). When [Enable] is set, user authentication can be performed even when communication with the LDAP authentication server is not available due to a communication breakdown, etc., so this machine can be used continuously.
Cache confirmation information validity period: Appears when [Cache authentication information] is set to [Enable]. Set the validity period of the temporarily saved authentication information in this machine on a daily basis. The setting range is 1 to 2000 days. After the set number of days, authentication with temporarily stored information will not be available any more.
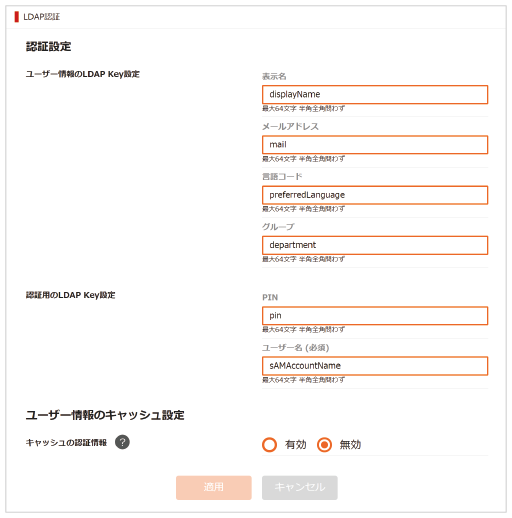
- Click [Apply].
Scroll the screen until [Role Assignment Regulations] is displayed, and define the regulations for automatically assigning roles to LDAP users.
- When the role assignment screen is displayed, input the LDAP key, the LDAP value and the applicable role.
When the LDAP value which is registered in the role assignment regulations of the user, and the LDAP value defined by the regulations are identified at the time of authentication, apply the role which is defined by each role assignment regulation to each user.
When a single user matches multiple role assignment regulations, all the roles which match those regulations are applied to the user.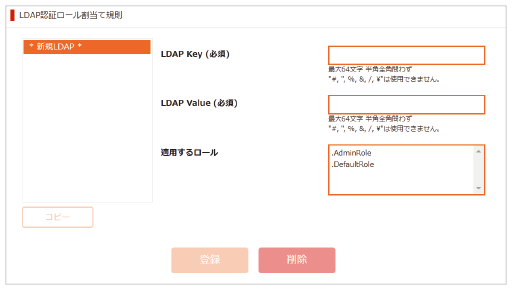
Click [Submit].