
Printing on envelopes
You can print on envelopes using Tray1 or the Multi Purpose Tray (MP Tray).
![]()
- Tray2/3/4 is not applicable.
Loading envelopes in Tray1
Check the paper precautions. Only two sizes of envelopes (Kakugata #2 and Yougata #0) can be loaded in Tray1.
Load envelopes with the print side facing down by referring to the following instructions.
Load them with the flap (opening margin) open.
For the detailed procedure, please refer to "Loading paper in Tray1/2/3/4".
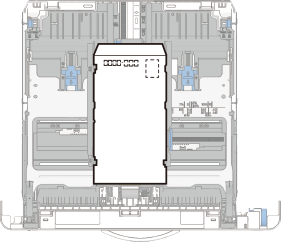
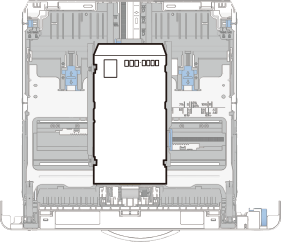
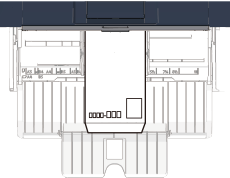
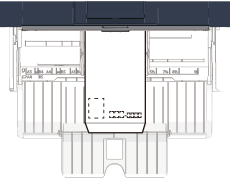
Envelope (Kakugata #2)
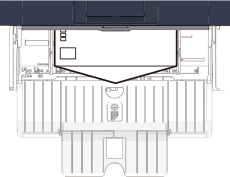
* Set the flap without breaking it.Envelope (Yougata #0
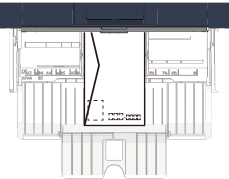
 )
)
* Set the flap without breaking it.Printing the address
Printing the sender
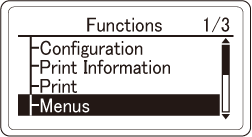
Check that "Ready To Print" appears on the display.
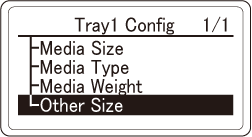
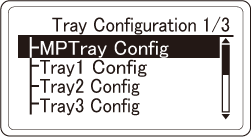
Press the scroll button ▼ on the operator panel several times to select [Menus], and press «OK».
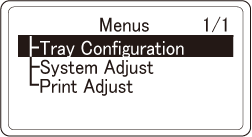
Check that [Tray Configuration] is selected, and press «OK».
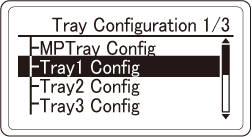
Press ▼ to select [Tray1 Config], and then press «OK».
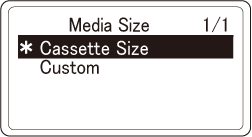
Check that [Media Size] is selected, and press «OK».

Check that [*] is displayed to the left of [Cassette Size], and then press «BACK». If [*] is not displayed, press ▲ to select [Cassette Size], and press «OK» and then «BACK».
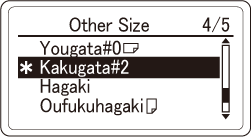
Press ▼ several times to select [Other Size], and then press «OK».
Press ▲ or ▼ several times to select a value that matches the envelopes to be loaded, and then press «OK». Check that [*] is displayed to the left of the selected setting.
Press «CANCEL» to return to the standby screen.
Loading envelopes in the MP Tray
Check the paper precautions.
Load envelopes with the print side facing up by referring to the following instructions.
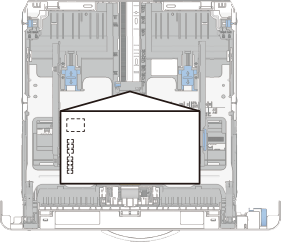
Load long envelopes (Nagagata #3, Nagagata #4, Nagagata #40, Kakugata #2 and Kakugata #3) with the flap (opening margin) open.
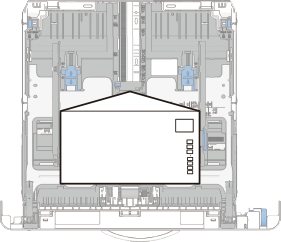
Load Yougata envelopes (Yougata #0
 and Yougata #4) with the flap (opening margin) folded.
Load Yougata envelopes (Yougata #0
) with the flap (opening margin) open.For the detailed procedure, please refer to "Loading paper in the MP Tray".
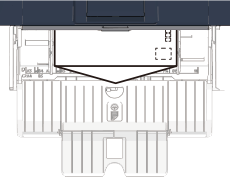
Envelope (Nagagata #3, Nagagata #4, Nagagata #40, Kakugata #2 and Kakugata #3)
* Set the flap without breaking it.Envelope (Yougata #0
and Yougata #4)Envelope (Yougata #0
)
* Set the flap without breaking it.Printing the address

Printing the sender
Check that "Ready To Print" appears on the display.
Press the scroll button ▼ on the operator panel several times to select [Menus], and press «OK».
Check that [Tray Configuration] is selected, and press «OK».
Check that [MPTray Config] is selected, and then press «OK».
Check that [Media Size] is selected, and press «OK».
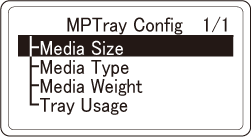
Press ▲ or ▼ several times to select a value that matches the envelopes to be loaded, and then press «OK». Check that [*] is displayed to the left of the selected setting.
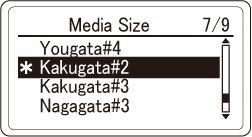
Press «CANCEL» to return to the standby screen.
Printing from a PC
![]()
- If you are using B822, refer to the PCL printer driver section.
For Windows PCL printer driver
- Open the file to be printed.
- Select [Print] from the [File] menu.
- Click [Preferences].
- Select [Envelope*] from [Size] in the [Setup] tab.
* Select the type of the envelope loaded. - Select the tray where envelopes are loaded from [Source].
Specify other settings as necessary, and click [OK].

- If you want to print while checking each sheet, click [Paper Feed Options] in [Setup] of the printer driver, and check [Feed paper individually] (or select [Yes]). To print continuously, uncheck [Feed paper individually] (or select [No]). For details, see "Printing one sheet at a time manually".
- Click [Print] in the [Print] screen.
For the Windows PS printer driver
- Open the file to be printed.
- Select [Print] from the [File] menu.
- Click [Preferences].
- Click [Advanced] in the [Layout] tab, and select [Envelope*] from [Paper Size].
* Select the type of the envelope loaded. - Click [OK].
- Select the tray where envelopes are loaded from [Paper Source] in the [Paper/Quality] tab.
Specify other settings as necessary, and click [OK].
- If you want to print while checking each sheet, check [Feeds paper one by one from the MP tray] in [Advanced] on the [Layout] tab of the printer driver (or select [Yes]). To print continuously, uncheck [Feeds paper one by one from the MP tray] (or select [No]). For details, see "Printing one sheet at a time manually".
- Click [Print] in the [Print] screen.
For macOS PCL printer driver
- Open the file to be printed.
- Select [Print] from the [File] menu.
- Select the envelope size in [Paper Size] and the orientation in [Orientation].
- Select [Multi Purpose Tray] from [Paper Source] on the [Setup] panel.
Specify other settings as necessary, and click [Print].
- If you want to print while checking each sheet, select [Multi Purpose Tray] from [Paper Source] in the printer driver, and check [Feeds paper one by one from the MP Tray] of [Paper feed options] (or select [Yes]). To print continuously, uncheck [Feeds paper one by one from the MP Tray] (or select [No]). For details, see "Printing one sheet at a time manually".
- If there is no detail settings displayed in the [Print] screen, click [Show Details] at the bottom of the screen.
For the macOS PS printer driver
- Open the file to be printed.
- Select [Print] from the [File] menu.
- Select the envelope size in [Paper Size] and the orientation in [Orientation].
- Select [Multi-Purpose Tray] from [All Pages From] on the [Paper Feed] panel.
Specify other settings as necessary, and click [Print].
- If you want to print while checking each sheet, select [Multi-Purpose Tray] from [All Pages From] on the [Paper Feed] panel in the printer driver, and check [Feeds paper one by one from the MP Tray] of [Paper feed options] on the [Printer Features] panel (or select [Yes]). To print continuously, uncheck [Feeds paper one by one from the MP Tray] (or select [No]). For details, see "Printing one sheet at a time manually".
- If there is no detail settings displayed in the [Print] screen, click [Show Details] at the bottom of the screen.