
4-2. Connecting with WPS
If the wireless LAN access point supports WPS, you can easily connect to the wireless LAN using the push button for easy setup (WPS button).
- Check the position of push button for easy setup (WPS button) and the time for which the button is pressed in the User's Manual enclosed with the wireless LAN access point.
- Check that the wireless LAN access point is activated and operating properly.
- Press the scroll button ▲ on the operator panel several times to select [Wireless (Infrastructure) Setting], and then press «OK».
Press ▲ or ▼ to input the admin password, and press «OK».

- "It is not possible to use the Wireless(AP Mode) at the same time." will be displayed for about 5 seconds.
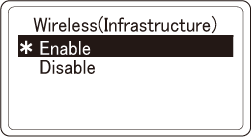
Press ▲ to select [Enable], and press «OK».
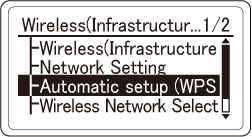
Press ▼ several times to select [Automatic setup (WPS)], and then press «OK».
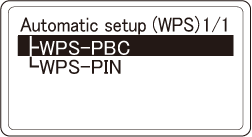
Check that [WPS-PBC] is selected, and press «OK».
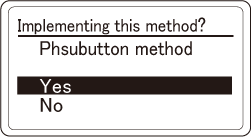
When "Implementing this method? Pushbutton method" is displayed, check that [Yes] is selected, and press «OK».
"Running pushbutton method" is displayed, and this machine will start to search for a wireless LAN access point.

Press and hold the push button of wireless LAN access point for the period of time confirmed in Step 1 or for a few seconds.
When "WPS connection successful" is displayed, the connection to the wireless LAN access point is completed.

Go to "6. Checking the connection from a PC".
![]()
- When "Not connected to wireless access point" or "Connection failed." is displayed, repeat the procedure from Step 1, or try "4-3. Manual setup and connection".