
Printing on irregular paper (Custom)
When printing on irregular paper (Custom), set the paper size, media type and media weight of the irregular size (Custom) on the operator panel. Before printing, register the paper size in the printer driver.
Setting the paper size before loading paper
Check the paper precautions.
Check that "Ready To Print" appears on the display.

- If the machine is in the power save mode, press «OK» to restore.
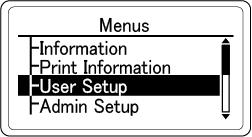
Press the scroll button ▼ on the operator panel to select [Menus], and then press «OK».

Press ▼ several times to select [User Setup], and press «OK».
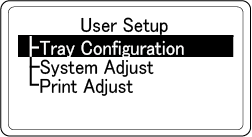
Check that [Tray Configuration] is selected, and press «OK».
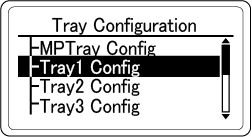
Press ▼ to select the setting of the tray where the paper is loaded, and then press «OK».
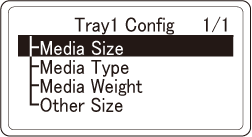
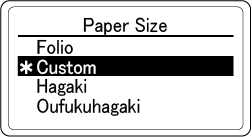
Check that [Paper Size] is selected, and press «OK».
Press ▲ or ▼ several times to select [Custom], and then press «OK».

Check that [*] is displayed to the left of [Custom], and then press «BACK».
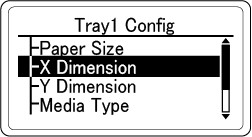
Press ▼ to select [X Dimension], and press «OK».
Press ▲ or ▼ to input the paper width, and then press «OK».

Check that [*] is displayed to the left of the value, and then press «BACK».

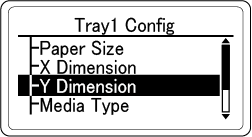
Press ▼ to select [Y Dimension], and press «OK».
Press ▲ or ▼ to input the paper length, and then press «OK».
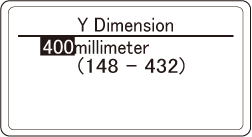
Check that [*] is displayed to the left of the value, and then press «BACK».

Press «CANCEL» to return to the standby screen.
Load paper in the tray to be used. When the setting change screen is displayed, press «BACK».
Printing from a PC
For the Windows PCL printer driver
Open the file to be printed.
- Select [Print] from the [File] menu.
- Click [More settings].
- Click [Paper Feed Options] in the [Setup] tab.
- Click [Custom Size].
- Input a name for the new size in [Name].
- Input values in [Width] and [Length].
- Click [Add] to save any paper size in the list, and click [OK].
Up to 32 settings can be saved. - Click [OK] until the [Printing Preferences] screen is closed.
- Open the file to be printed.
- Select [Print] from the [File] menu.
- Click [More settings].
- Select the paper size registered in [Size] on the [Setup] tab.
- Specify the media weight and other settings as necessary, and click [OK].
- Click [Print] in the [Print] screen.
For the Windows PS printer driver
Open the file to be printed.
- Select [Print] from the [File] menu.
- Click [More settings].
- Click [Advanced] in the [Layout] tab.
- Click [Paper Size], and select [PostScript Custom Page Size] from the pull-down menu.
- Click [Edit Custom Page Size].
Input values in [Width] and [Height], and click [OK].

- [Offset Relative to Paper Feed Direction] cannot be set.
- Click [OK].
- Specify the media weight and other settings as necessary, and click [OK].
- Click [Print] in the [Print] screen.
For the macOS PCL printer driver
![]()
- When using macOS, you cannot print properly, although you can set the paper size beyond the usable range. Set the paper size within the range.
- macOS may regard the custom-sized paper which is close to a fixed size as the fixed-sized paper.
- Open the file to be printed.
- Select [Page Setup] from the [File] menu.
- Select [Manage Custom Sizes] from [Paper Size].
- Click [+] to add an item to the list of paper size.
- Double-click on [Untitled], and input a name for the paper size.
- Select a printer from [Non-Printable Area].
- Input values in [Width] and [Height].
- Click [OK] until [Page Setup] is closed.
- Select [Print] from the [File] menu.
- Select a paper size registered in [Paper Size].
Specify the media weight and other settings as necessary, and click [Print].
- If there is no detail settings displayed in the [Print] screen, click [Show Details] at the bottom of the screen.
For the macOS PS printer driver
![]()
- When using macOS, you cannot print properly, although you can set the paper size beyond the usable range. Set the paper size within the range.
- macOS may regard the custom-sized paper which is close to a fixed size as the fixed-sized paper.
- Open the file to be printed.
- Select [Page Setup] from the [File] menu.
- Select [Manage Custom Sizes] from [Paper Size].
- Click [+] to add an item to the list of paper size.
- Double-click on [Untitled], and input a name for the paper size.
- Select a printer from [Non-Printable Area].
- Input values in [Width] and [Height].
- Click [OK] until [Page Setup] is closed.
- Select [Print] from the [File] menu.
- Select a paper size registered in [Paper Size].
Specify the media weight and other settings as necessary, and click [Print].
- If there is no detail settings displayed in the [Print] screen, click [Show Details] at the bottom of the screen.