
Using the WIA Driver (Windows)
This section describes how to start scanning from a WIA compatible application via USB or WSD Scan connection.
Memo
-
The WIA driver does not support the network scan function. Connect the machine to a computer via a USB interface or WSD Scan.
-
The WIA driver does not support Mac OS X.
-
The WIA 2.0 driver supports Windows 10/Windows 8.1/Windows Sever 2012 R2/Windows 8/Windows Server 2012/Windows 7/Windows Server 2008 R2.
-
The WIA 1.0 driver supports Windows Vista/Windows Server 2008/Windows Server 2003.
To scan using WIA Driver, preparation procedure such as installation of the scanner driver is required.
You also need to set the machine in the stand-by mode for Remote Scan before starting scanning on the computer.
Scanning
Memo
The following procedure uses Adobe Photoshop CS3 as an example.
-
Set a document in the ADF or on the document glass.
-
Start Adobe Photoshop CS3 on the computer.
-
Select [Import] from [File], and then select [WIA: OKI Universal WIA] for the USB connection or select [WIA-OKI-XXXXX] for the WSD scan.
-
Click [Scan].
-
Select a paper feed method.
-
Select an image type.
-
Specify the area to scan.
-
Click [Scan].
-
To complete scanning, click [Cancel].
-
If you do not scan other pages or the back side, click [Quit].
Using Windows Fax and Scan
"Windows FAX and Scan" is a function available with Windows 10/Windows 8.1/Windows 8/Windows 7/Windows Vista.
-
Set a document in the ADF or on the document glass.
-
Start Windows Fax and Scan on a computer from.
For Windows 7/Vista:
-
Click [Start] on a Windows, and then select [All Programs] > [Windows FAX and Scan].
For Windows 8:
-
Right-click on the [Start] screen, and then select [All Apps] > [Windows FAX and Scan].
For Windows 8.1:
-
Click the down arrow icon on the [Start] screen, and then select [Windows FAX and Scan].
For Windows 10:
-
Click [Start] on a Windows , and then select [All Apps] > [Windows Accessories] > [Windows FAX and Scan].
-
-
Click [New Scan].
-
Select [OKI Universal WIA] for the USB connection or select [OKI-XXXXX] for the WSD scan, and then click [OK].
-
Set the setting if necessary.
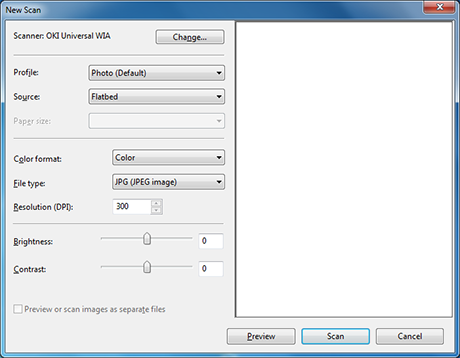
-
Click [Scan].
-
Exit [Windows FAX and Scan].