
Before Using Remote Scan
Before using the remote scan function, you need the following settings corresponding to the connection method and OS of your computer.
Note
When connecting the machine to the network, set the followings.
-
Set [TCP/IP] to [Enable].
-
Match the IP version between the machine and a computer.
-
Set the DNS server.
Memo
The required software varies depending on the OS of your computer and the function to use. Install the appropriate software.
On the Windows computer, Remote Scan function can be used with ActKey, TWAIN Driver, WIA Driver, or WSD Scan.
Refer to the following.
Before Using Remote Scan with ActKey, TWAIN Driver, or WIA Driver
Before Using Remote Scan with WSD Scan
If you use Mac OS X, you can use Image Capture.
Refer to the following.
Before Using Remote Scan with Image Capture (Mac OS X)
Before Using Remote Scan with the ActKey, TWAIN Driver, WIA Driver
-
Set the machine for using Remote Scan.
Refer to the following.
Setting to Use Remote Scan
-
Set the type of stand-by mode for Remote Scan.
Refer to the following.
Selecting a Remote Scan Mode
-
Install the scanner driver and ActKey.
Installing a Driver and Software to a Computer
For the USB connection, setting is complete.
-
Register a computer that is used for Secure Scan in the machine. (Only when you use Secure Scan.)
Registering a Computer That is Connected
Memo
-
Your computer may automatically be registered when the scanner driver is installed.
-
If the computer information, such as computer name or IP address is changed, you need to newly register the information.
-
Before Using Remote Scan with WSD Scan
-
Set the machine for using WSD Scan on the machine.
-
Set the type of stand-by mode for Remote Scan.
-
Install this machine as a WSD device to a connected computer.
For details, see "Before Using WSD Scan".
When the machine is installed in the computer, the computer is also registered to the machine as a destination computer for WSD Scan.
Before Using Remote Scan with Image Capture (Mac OS X)
If you use Mac OS X, you can use Image Capture.
-
Set the machine for using Remote Scan.
-
Set the type of stand-by mode for Remote Scan.
Refer to the following.
Selecting a Remote Scan Mode
-
Install the Mac OS X scanner driver.
Installing a Driver and Software to a Computer
For the USB connection, setting is complete.
-
Register a computer that is used for Secure Scan in the machine. (Only when you use Secure Scan.)
Registering a Computer That is Connected
Memo
If the computer information, such as computer name or IP address is changed, you need to newly register the information.
Setting to Use Remote Scan
Enable the Network TWAIN function so that you can use the Remote Scan function on a computer.
Note
If you set this function to [OFF], you cannot use the Scan To Computer function and Remote Scan.
-
Press [Device Settings] on the touch panel.
-
Press
 or
or  several times to select [Admin Setup].
 -
Enter the administrator name and password and press [OK].
The factory default administrator name and password are "admin" and "aaaaaa" respectively.
-
Press [Scanner Setup].
-
Press [TWAIN Setup].
-
Check that [Network TWAIN] is set to [ON].
Memo
Pressing [Network TWAIN] switches between [ON] and [OFF].
-
Press [Back] until the home screen is displayed.
Selecting a Remote Scan Mode
There are three Remote Scan modes: Simple Scan, Manual Scan, and Secure Scan.
In Simple Scan mode, you can start scanning anytime if the machine is in standby status.
In Manual Scan mode, you must turn Remote Scan on the touch panel before starting scanning.
In Secure Scan mode, you can operate only from a specified computer. Only one computer can be connected at a time.
If you perform a remote scan via the WSD Scan connection, you can start scanning only from computers that are already registered in this machine, regardless of the Remote Scan modes.
-
Press [Device Settings] on the touch panel.
-
Press
or several times to select [Admin Setup]. -
Enter the administrator name and password and press [OK].
The factory default administrator name and password are "admin" and "aaaaaa" respectively.
-
Press [Scanner Setup].
-
Press
or several times to select [PC Scan Mode].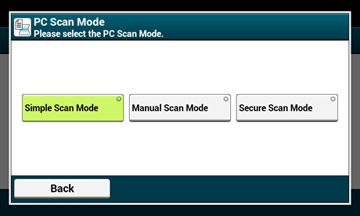
-
Select a scan mode, and then press [OK].
-
Press [Back] until the home screen is displayed.