
Using Network Configuration (Windows)
About Network Configuration
Network Configuration is a tool to set in advance when performing Scan To Computer. Also, if information, such as the IP address of the machine or computer, is changed when performing a network scan, you can change the setting values with this tool.
When you install ActKey, Network Configuration is also installed at the same time.
When you start a computer, Network Configuration is automatically included in the task bar.
Registering the Machine (New Machine) to Network Configuration
-
Click [Start], and then select [All Programs] > [Okidata] > [ActKey] > [Tools] > [Network Configuration].
-
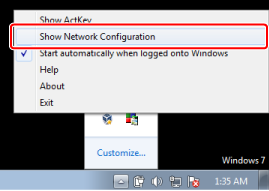
Right-click [Show Network Configuration] in the task tray.
-
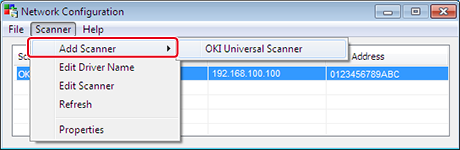
Select a scanner driver to use, and then select [Add Scanner] from the [Scanner] menu.
-
Select the scanner driver name to be added.
Setting Scan To Computer
To perform Scan To Computer, you must register the computer name, IP address, and port number to the machine.
For details, see "Using Network Configuration (Windows)" in "Registering a Computer That is Connected".
Changing the Setting Information of the Registered Machine
Change the IP address and port number of the machine.
-
Click [Start], and then select [All Programs] > [Okidata] > [ActKey] > [Tools] > [Network Configuration].
-
Right-click [Show Network Configuration] in the task tray.
-
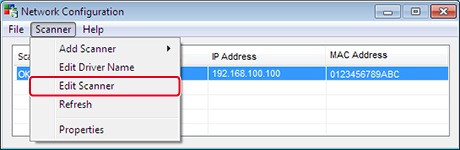
Select the scanner driver and select [Edit Scanner] from the [Scanner] menu.
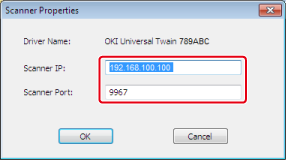
The setting value that is currently set to the computer is displayed.
-
Change to the IP address and port number of the machine.
Deleting Computer Information Registered in the Machine
For details, see "Using Network Configuration (Windows)" in "Removing Computer".