
Setting a Document
This chapter describes how to set the document on this machine.
About Documents That Can be Set
About Where to Set a Document
Set a document in the ADF or on the document glass to copy, scan, or fax the document.
-
ADF
|
Scannable size |
A3, A4 |
|---|---|
|
Paper capacity |
100 sheets (80 g/m2) or maximum rise of 10 cm (4 inches) |
|
Paper weight |
60 to 120 g/m2 (16 to 32 lb) |
-
Document glass
|
Scannable size |
A3, A4 |
|---|---|
|
Document thickness |
Up to 20 mm |
Memo
Duplex scan is not available for A5  , A6, B5 , Statement .
Note
For documents on which adhesives, ink, or correction fluid is used, make sure that they have completely dried before setting.
About Documents That Cannot be Set
You cannot set the following documents in the ADF. Use the document glass, instead.
-
Documents with holes or tears
-
Documents folded or damaged
-
Documents with fold lines or badly curled, or rolled documents
-
Damp documents
-
Documents that are stuck together due to static electricity
-
Carbon-backed documents
-
Cloth, metal sheets, OHP films
-
Stapled, clipped, tagged, or taped documents
-
Documents that are pasted each other, or documents with glue
-
Glossy documents
-
Coated documents
-
Documents with undried correction fluid, ink
Observe the following to avoid damaging the document glass.
-
When copying a thick document, do not press on it on the document glass.
-
Place a hard document gently.
-
Do not set a document that has sharp protrusions.
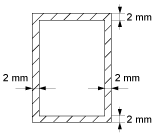
About the Scannable Area When Copied
Texts or images within the 2 mm area from the edges of standard paper cannot be scanned with the copy function.
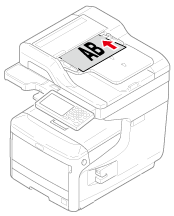
Symbols Indicating Document Orientation
-
This symbol indicates that the document is placed in the vertical orientation from the front of this machine.
For the ADF, place the document in such a way as to feed the long edge first.
-
 This symbol indicates that the document is placed in the horizontal orientation from the front of this machine.
For the ADF, place the document in such a way as to feed the short edge first.
-
When setting an A4
document in the ADF
-
When setting an A4
document in the ADF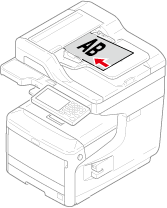
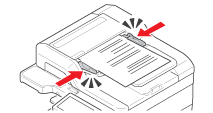
Setting in the ADF
-
Set a document face up in the ADF.
If [Direction] is set to [Top Edge on Top], set the document so that its left edge is pulled into the ADF first.
If [Direction] is set to [Top Edge on Left], set the document so that its top edge is pulled into the ADF first.
-
Align the document guide to the document width.
Note
-
If ADF paper feed problems often occur, reduce the number of document pages to set.
-
Documents of up to 100 sheets (80 g/m2) and 10 mm high can be loaded regardless of the size.
-
For curled documents, make sure that the document guides fit to the document width.
Memo
The machine automatically detects the following document sizes.
Series
Detectable sizes
AB
A3, A4
, A4 , A5 , A5 , A6 , B4, B5 , B5 , FolioLetter
Tabloid, Letter
, Letter , Legal14, Executive , Statement * If Legal14 is detected in the Letter series, the value between Legal13, Legal13.5, and Legal14 which is specified from [Device Settings] > [Admin Setup] > [Scanner Setup] > [Default Settings] > [Auto detect Scan Size] > [Legal Size] is set as Scan Size.
-
If the machine cannot automatically detect the document size, set it manually.
Setting the document size manually
Changing the Scan Size (Scan Size)
-
Setting on the Document Glass
-
Open the document glass cover.
-
Set a document face down on the document glass.
If a document is portrait, align its top edge with the upper-left corner of the glass.

If a document is landscape, align its right edge with the upper-left corner of the glass.

Note
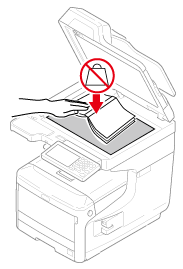
Do not press the document glass forcefully.
-
Close the document glass cover gently.
You must change the [Direction] setting to suit the document orientation (portrait or landscape) in advance.
About the [Direction] setting
Changing the Document Orientation (Direction)
Memo
The machine automatically detects the following document sizes.
Series
Detectable sizes
AB
A3, A4
, A4 , A5 , A5 , A6 , B4, B5 , B5 , FolioLetter
Tabloid, Letter
, Letter , Legal14, Executive , Statement * If Legal14 is detected in the Letter series, the value between Legal13, Legal13.5, and Legal14 which is specified from [Device Settings] > [Admin Setup] > [Scanner Setup] > [Default Settings] > [Auto detect Scan Size] > [Legal Size] is set as Scan Size.
-
If the machine cannot automatically detect the document size, set it manually.
Setting the document size manually
Changing the Scan Size (Scan Size)
Note
-
When the document is set on the document glass, the document size is detected after the document glass cover is closed. Be sure to close the document glass cover.
-
For documents thicker than 1.5 mm, the document size may not be detectable.
-