
This section describes how to replace the image drum and toner cartridge with new ones at the same time.
Note
-
Use extra care when handling the image drum (the green cylinder), because it is fragile.
-
Do not expose the image drum to direct sunlight or strong light (approximately 1,500 lux or more). Do not leave the image drum for 5 minutes or more even under room light.
-
Prepare new image drum and toner cartridge.
-
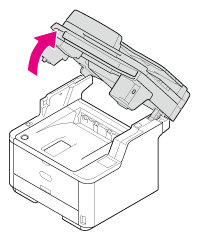
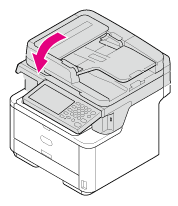
Open the scanner unit.
-
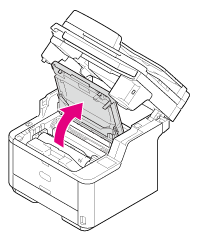
Press the top cover open button.

-
Open the top cover.
-
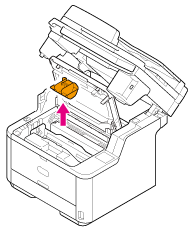
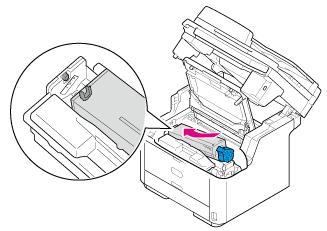
Hold the image drum handle with both hands, and then remove the image drum from the machine.
Note
While removing consumables, be careful not to hit them to the LED head.

Burns may result.

Never throw a used image drum or toner cartridge into a fire. They may explode, and the toner inside may fly off and cause burns.

The toner cartridge is removed with the image drum.
-
Rotate the blue lever of the toner cartridge in the direction of the
 (Unlock) arrow until it stops, and then remove the toner cartridge from the image drum.
Place the toner cartridge on a flat place.
-
Unpack a new image drum.
-
Remove the silica gel pack.

Note
Always use a new image drum. An image drum that has been used on another printer cannot be used.
-
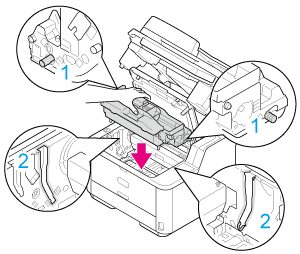
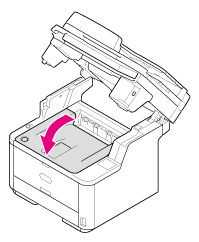
Align the guide posts (1) on the left and right sides of the image drum with their guide grooves (2) on the left and right sides inside the machine, and then set the image drum into the printer gently.
-
Press the toner cover removal button on the image drum.

-
Remove the toner cover.
Note
-
Toner may remain on the reverse side of the toner cover. Use care not to stain other parts when removed.
-
Use extra care when handling the image drum (the green cylinder), because it is fragile.
-
Do not expose the image drum to direct sunlight or strong light (approximately 1,500 lux or more). Do not leave the image drum for 5 minutes or more even under room light.
-
Do not leave the image drum for 1 hour or more, even if it is covered with black paper.
Memo
Dispose of the toner cover as incombustible waste.
-
-
Install a new toner cartridge.
For the installation method, refer to steps 10 to 12 in "Replacing the Toner Cartridge".
-
Close the top cover.
-
Close the scanner unit.
Memo
If you must dispose of an image drum, put it in a plastic bag or similar container and dispose of it in accordance with your municipality's ordinances or guidelines.