
To use Google Cloud Print, a Google account is required. This section describes how to register the machine in Google Cloud Print using a Google account.
If you already have an account, there is no need to create a new account. Proceed to step 3.
Memo
-
To enter the [Google Cloud Print] menu, the administrator password is required. The factory default administrator password is "123456".
-
Although this manual describes the procedure for setting the servers from the operator panel, it is recommended to set the servers from the Web page of this machine if you can operate from a computer.
To check from the Web page, select [Admin Setup] > [Network] > [TCP/IP] in "About Items That Can be Set or Checked".
-
Access the Google Web site from a computer, smartphone, or other mobile device.
Google Web site (https://accounts.google.com/signup)
-
Create a Google account by following the on-screen instructions.
-
Check the IP address, subnet mask, and gateway address of the machine are set correctly.
-
Press the scroll button
 several times to select [Google Cloud Print] and press the «ENTER» button.
 -
Press the scroll button
to select [Google Cloud Print Settings] and press the «ENTER» button. -
Enter the administrator password using the numeric (0-9) keys, and then press the «ENTER» button.
Memo
-
The factory default administrator password is "123456". If the administrator password is changed, enter the updated password.
-
-
Press the scroll button
to select [DNS Server (Primary)] and press the «ENTER» button.Since [0.0.0.0] indicates that the value is not set correctly, set the IP address that suits your environment.
If the secondary DNS server is used, check the [DNS Server (Secondary)] setting value.
If the proxy server is used, press the scroll button
to select [Proxy] and press the «ENTER» button. -
Press the scroll button
to select [Enable] and press the «ENTER» button.Memo
-
If the proxy server is not used, proceed to step 20.
-
-
Press the «BACK» button to go back to the [Google Cloud Print Settings] screen.
-
Press the scroll button
to select [Proxy Server] and press the «ENTER» button. -
Enter a server name.
You can enter up to 64 characters.
-
Press the scroll button
to select [OK] and press the «ENTER» button. -
Press the scroll button
to select [Proxy Server Port No.] and press the «ENTER» button. -
Enter the Proxy Server Port No., and then press the «ENTER» button.
-
Press the scroll button
to select [Proxy UserID] and press the «ENTER» button. -
Enter the Proxy UserID, and then press the «ENTER» button.
You can enter up to 64 characters.
-
Press the scroll button
to select [Proxy Password] and press the «ENTER» button. -
Enter the proxy password, and then press the «ENTER» button.
You can enter up to 64 characters.
Memo
-
For the setting values, contact your network administrator.
-
-
Press the «BACK» button to return to the [Google Cloud Print] menu.
-
Press the scroll button
 to select [Register to Google Cloud Print] and press the «ENTER» button.
 -
Enter the administrator password, and then press the «ENTER» button.
Memo
-
The factory default administrator password is "123456". If the administrator password is changed, enter the updated password.
-
-
When the "Register?" message is displayed, select [Yes] and press the «ENTER» button.
-
The authentication destination URL is displayed.
Press the scroll button
to select [OK] and press the «ENTER» button. The authentication destination URL is printed.Note
-
There is a time restriction for registration (authentication) processing (approximately 10 minutes).
-
Proceed to step 28 within the time restriction to complete the registration.
-
If you cannot complete within the time restriction and an error message is displayed, return to step 20, and then register again.
-
-
Access the authentication destination URL that you printed in step 23 from a computer or mobile device.
-
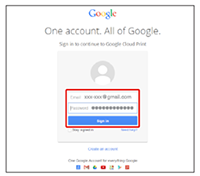
When the Google account login screen is displayed, enter the Google account information, and then click [Sign in].
-
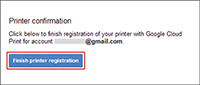
When the registration screen is displayed, click [Finish printer registration].
-
Wait until the message telling the completion of the printer registration is displayed.
-
When the registration content and completion message are displayed on the display screen of the machine, check the message.