
-
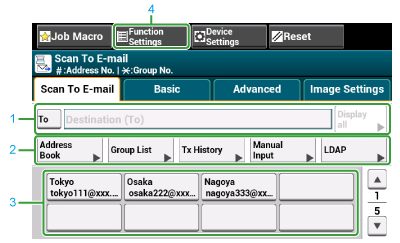
[Scan To E-mail] Tab
|
|
Item |
Description |
|---|---|---|
|
1 |
Destination area |
Select a destination e-mail address. The selected e-mail address appears in this area. If at least 1 destination is specified, you can press [Display all] to edit, add, or delete a destination. |
|
2 |
Shortcut buttons |
Displays shortcut buttons for using certain scan functions. The screen image shows the factory default setting. Shortcut buttons on the screen can be customized to fit your needs. Refer to "How to Customize the Touch Panel". |
|
3 |
One touch buttons |
Displays destinations assigned to one-touch buttons. Press a button to add a destination. |
|
4 |
Function Settings |
Displays the current settings. The setting can be changed for certain functions. |
-
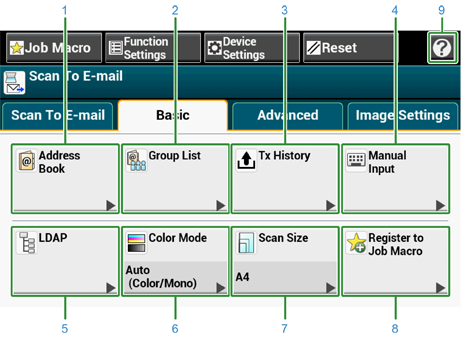
[Basic] Tab
|
|
Item |
Description |
|---|---|---|
|
1 |
Address Book |
Displays e-mail addresses registered in the Address Book. Select an e-mail address as a destination from the Address Book. |
|
2 |
Group List |
Displays a list of groups in which e-mail addresses are registered. Select a group as a destination from the Group List. |
|
3 |
Tx History |
Displays a transmission history. Select a destination from the transmission history. |
|
4 |
Manual Input |
Enter an e-mail address manually to use it as a destination. |
|
5 |
LDAP |
Search for an e-mail address from the LDAP server to use it as a destination. There are two search methods: Simple Search and Advanced Search. |
|
6 |
Color Mode |
Specifies color mode to scan a document. |
|
7 |
Scan Size |
Specifies the scan size when scanning a document. |
|
8 |
Register to Job Macro |
Registers current settings to Job Macro. |
|
9 |
|
Displays Help topics. |
-
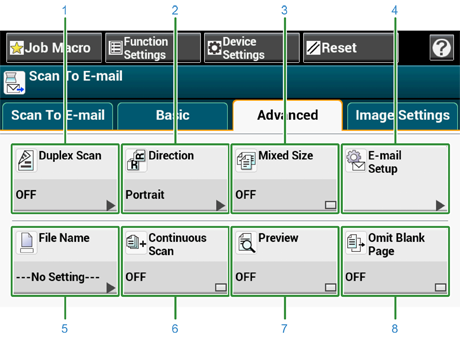
[Advanced] Tab
|
|
Item |
Description |
|---|---|---|
|
1 |
Duplex Scan |
Specifies duplex scanning. Set this function when scanning both sides of a document. |
|
2 |
Direction |
Specifies the orientation of images. |
|
3 |
Mixed Size |
Scans documents of different sizes. |
|
4 |
E-mail Setup |
Specifies an e-mail address as a reply destination. If the recipient replies to the received e-mail, the reply is sent to the e-mail address specified here. Specifies the subject of the e-mail. Specifies the body of the e-mail. |
|
5 |
File Name |
Specifies a file name for the scanned file. If not specified, the file will be named according to the factory default setting. |
|
6 |
Continuous Scan |
Scans multiple documents as a single job. |
|
7 |
Preview |
Specifies whether to preview scanned images. |
|
8 |
Omit Blank Page |
Skips blank pages when scanning. |
-
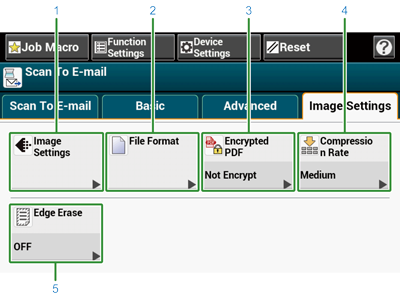
[Image Settings] Tab
|
|
Item |
Description |
|---|---|---|
|
1 |
Image Settings |
Specifies the following image settings: density, document type, resolution, background removal, show-through removal, contrast, hue, saturation, and RGB. |
|
2 |
File Format |
Specifies a file format for the scanned file. |
|
3 |
Encrypted PDF |
Creates an encrypted (password-protected) scanned file. This function is available only when the file format is set to PDF or HC-PDF. |
|
4 |
Compression Rate |
Specifies a compression level for the scanned file. |
|
5 |
Edge Erase |
Eliminates a black shadow that may appear around the edges on the scanned file when scanning, for example, a book. |
-
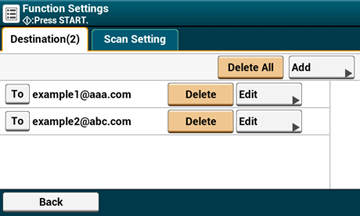
[Function Settings] > [Destination] Tab
Add, edit or delete a destination to which a document is sent.
-
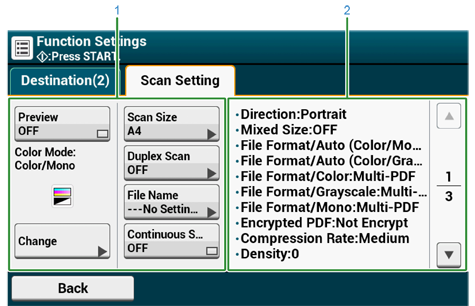
[Function Settings] > [Scan Setting] Tab
|
|
Item |
Description |
|---|---|---|
|
1 |
Setting display area 1 |
Displays the current settings for displayed items. |
|
2 |
Setting display area 2 |
Displays a list of settings that are not set by items displayed in setting display area 1. |