
Note
-
Curling or creasing may occur after printing. Be sure to perform a test print to check that no problems exist.
-
Load envelopes with the address side up in the direction as described below.
-
If you are using envelopes with the flap (for gluing) on the long edge (Monarch, Com-9, Com-10, DL, C5), load them with the flap folded so that the flap is on the left side when fed.
-
-
Duplex printing is not available for envelopes.
Attaching the Envelope Lever
If a printed envelope is wrinkled, attach the envelope lever to the fuser unit.
-
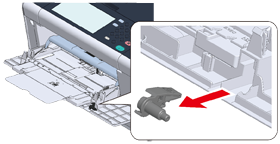
Remove the envelope lever from the MP tray.
-
Remove the fuser unit from the machine.
For details, see "Replacing the Fuser Unit".

Possible to get burned.

Since the fuser unit gets hot, carry out the operation carefully, and when lifting it up you must hold it by the handle. Do not try to hold it whilst it is hot. Wait until it has cooled down and then carry out the operation.
-
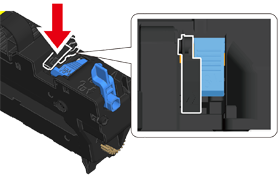
Attach the envelope lever to the fuser unit.
Press the jam release lever, and then insert the envelope lever in to the nearby hole.
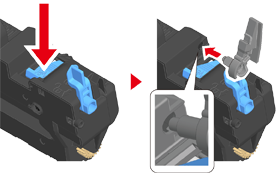
Push the lever to lock.
-
Replace the fuser unit to the machine.
For details, see "Replacing the Fuser Unit".
Loading Envelopes
When printing on envelopes, change the paper size setting, and use the MP tray and rear output tray.
-
Load envelopes until their edges touch the paper feed entrance with the print side up.

Com-9, Com-10, DL, C5, Monarch
-
Open the rear output tray.
-
Press [Device Settings] on the touch panel.
-
Press [Paper Setup].
-
Press [MP Tray].
-
Press [Paper Size].
-
Press the size of envelopes you use.
-
Press [Back] until the home screen is displayed.
For Windows PCL Printer Driver
-
Open the file to print.
-
Select [Print] from the [File] menu.
-
Click [Preferences].
-
Select the envelope size from [Size] on the [Setup] tab.
-
Select [Multi Purpose Tray] from [Source].
-
Select [Landscape] from [Orientation].
-
Change other settings if necessary, and then click [OK].
-
Click [Print] on the [Print] screen.
-
Open the output tray and remove the fuser unit, and then remove the envelope lever.
For details, see "Removing the Envelope Lever".
For Windows PS Printer Driver
-
Open the file to print.
-
Select [Print] from the [File] menu.
-
Click [Preferences].
-
Click [Advanced] on the [Layout] tab and select the envelope size from [Paper Size].
-
Click [OK].
-
Select [Landscape] from [Orientation] on the [Layout] tab.
-
Select [Multi-Purpose Tray] from [Paper Source] on the [Paper/Quality] tab.
-
Change other settings if necessary, and then click [OK].
-
Click [Print] on the [Print] screen.
-
Open the output tray and remove the fuser unit, and then remove the envelope lever.
For details, see "Removing the Envelope Lever".
For Mac OS X
-
Open the file to print.
-
Select [Print] from the [File] menu.
-
Select the envelope size from [Paper Size] and select the orientation from [Orientation].
-
Select [Multi-Purpose Tray] for [All Pages From] on the [Paper Feed] panel.
-
Change other settings if necessary, and then click [Print].
-
Open the output tray and remove the fuser unit, and then remove the envelope lever.
For details, see "Removing the Envelope Lever".
Memo
If setting details are not displayed in the print dialog, click [Show Details] at the bottom of the dialog.
Removing the Envelope Lever
When all the envelopes are printed, remove the envelope lever from the fuser unit.
-
Remove the fuser unit from the machine.
For details, see "Replacing the Fuser Unit".
-
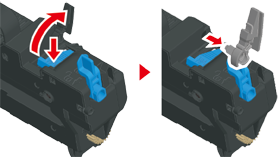
Press the jam release lever and lift the envelope lever, and then remove it.
-
Replace the fuser unit to the machine.
For details, see "Replacing the Fuser Unit".
-
Attach the envelope lever to the MP tray.