
Color Correct Utility
Note
-
Apply settings for each printer driver.
-
You must be logged in as an administrator to perform color matching using the Color Correct Utility.
Changing Palette Color
Color Correct Utility allows you to specify colors on the palette selected in software such as Microsoft Excel.
For Windows
-
Click [Start] and select [All Programs] > [Okidata] > [Color Correct Utility] > [Color Correct Utility].
-
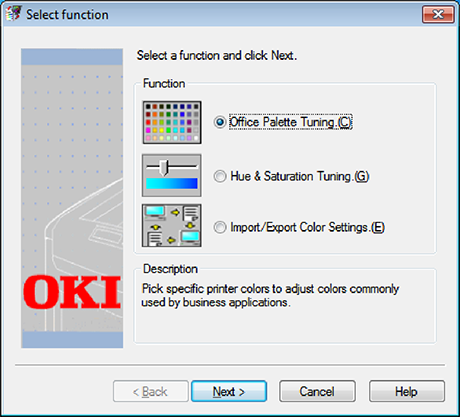
Select [Office Palette Tuning] and then click [Next].
-
Select the machine and click [Next].
-
Select the name the setting you want and then click [Print Sample].
-
Click [Next].
-
Click [Print Palette].
-
Compare the colors of the color palette on the screen with those of the printed color sample for adjustment.
Colors marked with cross cannot be adjusted.
-
Click the color you want to adjust.
-
Check each adjustable range from the pull-down menu for X and Y.
The adjustable value varies depending on the color.
-
Check the printed color swatch to select the most suitable color you want within the adjustable range, and then check the X and Y values.
-
Select the values you checked at step 10, and then click [OK].
-
Click [Print Palette] and check if the adjusted color is closer to the color you want and then click [Next].
If you want to change the color more or change other colors, repeat steps 8 to 11.
-
Enter a name to save as, and then click [Save].
-
Click [OK].
-
Click [Finish].
For Mac OS X
-
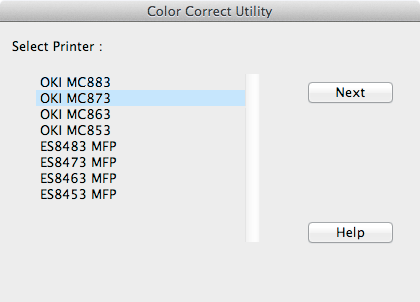
Launch Color Correct Utility.
-
Select the machine.
-
Click [Next].
-
Click [Office Palette Tuning].
-
Select the name of the setting you want, and then click [Print Swatches].
-
Click [Next].
-
Click [Print Palette].
-
Compare the colors of the color palette on the screen with those of the printed color sample for adjustment.
Colors marked with cross cannot be adjusted.
-
Click the color you want to adjust.
-
Check each adjustable range from the pull-down menu for X and Y.
The adjustable value varies depending on the color.
-
Check the printed color swatch to select the most suitable color you want within the adjustable range, and then check the X and Y values.
-
Select the values you checked at step 11, and then click [OK].
-
Click [Print Palette] and check that the adjusted color is closer to the color you want.
If you want to change the color more or change other colors, repeat steps 9 to 13.
-
Enter a name and then click [Save].
-
Select [Print & Scan] from [System Preferences] to delete and reregister all machines for which adjustments were made.
Changing Gamma Value or Hue
You can adjust tone by adjusting the gamma value and output color by adjusting the hue.
For Windows
-
Click [Start] and select [All Programs] > [Okidata] > [Color Correct Utility] > [Color Correct Utility].
-
Select [Hue & Saturation Tuning.] and then click [Next].
-
Select the machine and click [Next].
-
Select the standard mode and click [Next].
-
Apply settings as necessary by adjusting the slide bar.
If you select the [Use printer's unadjusted color] check box, 100 percent of each color is used for printing, and the slide bar of hue is fixed.
-
Click [Print Test].
-
Check the print result.
If you are not satisfied with the result, repeat steps 5 to 6.
-
Click [Next].
-
Enter a name and then click [Save].
A dialog box appears.
-
Click [OK].
-
Click [Finish].
For Mac OS X
-
Launch Color Correct Utility.
-
Select the machine.
-
Click [Next].
-
Click [Gamma/Hue/Saturation Tuning].
-
Select the standard mode and click [Next].
-
Apply settings as necessary by adjusting the slide bar.
If you select the [Use default printer hue] check box, 100 percent of each color is used for printing, and the slide bar of hue is fixed.
-
Click [Print Test].
-
Check the print result.
If you are not satisfied with the result, repeat steps 6 to 8.
-
Enter a name and then click [Save].
-
Select [Print & Scan] from [System Preferences] to delete and reregister all machines for which adjustments were made.
Printing in Adjusted Color Settings
For Windows PCL Printer Driver
-
Open the file you want to print.
-
Select [Print] from the [File] menu.
-
Click [Preferences] or [Properties].
-
Click [Detail] in the [Setup] tab and select [Office Color].
-
Select the [Color Correct Utility Settings] and select the setting you created with the Color Correct Utility and then click [OK].
For Windows PS Printer Driver
-
Open the file you want to print.
-
Select [Print] from the [File] menu.
-
Click [Preferences] or [Properties].
-
Select the [Color] tab and select [Office Color] and then click [Detail].
-
Select the [User Settings] and select the setting you created with the Color Correct Utility and then click [OK].
For Mac OS X PS Printer Driver
-
Open the file you want to print.
-
From the [File] menu, select [Print].
-
Click [Office Color] on the [Color] panel.
-
Select the setting you created with the Color Correct Utility from [RGB Color Setting].
Saving Color Correction Settings
You can save the adjusted color settings to a file.
Note
The administrator's authority is needed for this function.
For Windows
-
Click [Start] and select [All Programs] > [Okidata] > [Color Correct Utility] > [Color Correct Utility].
-
Select [Import/Export Color Settings.] and then click [Next].
-
Select the machine and click [Next].
-
Click [Export].
-
Select the settings to export and click [Export].
-
Specify the file name and the folder to save to, and then click [Save].
-
Click [OK].
-
Click [Finish].
For Mac OS X
-
Launch Color Correct Utility.
-
Select the machine.
-
Click [Next].
-
Click [Manage Color Settings].
-
Click [Export].
-
Select the settings to export and click [Export].
-
Specify the file name and the folder to save to, and then click [Save].
-
Click [Cancel].
Importing Color Correction Settings
You can import color correct settings from files.
For Windows
-
Click [Start] and select [All Programs] > [Okidata] > [Color Correct Utility] > [Color Correct Utility].
-
Select [Import/Export Color Settings.] and then click [Next].
-
Select the machine, and click [Next].
-
Click [Import].
-
Select the file and click [Open].
-
Select the settings to import and click [Import].
-
Check that the setting is imported properly and then click [Finish].
For Mac OS X
-
Launch Color Correct Utility.
-
Select the machine.
-
Click [Next].
-
Click [Manage Color Settings].
-
Click [Import].
-
Select the folder in which settings to be imported are saved, and click [Open].
-
Select the settings to import and click [Import].
-
Click [Cancel].
-
Check that the setting is imported properly.
Deleting Color Correction Settings
For Windows
-
Click [Start] and select [All Programs] > [Okidata] > [Color Correct Utility] > [Color Correct Utility].
-
Select [Import/Export Color Settings.] and then click [Next].
-
Select the machine, and click [Next].
-
Select the file you want to delete and click [Delete].
A dialog box appears.
-
On the confirmation screen, click [Yes].
-
Check that the setting is deleted properly and then click [Finish].
For Mac OS X
-
Launch Color Correct Utility.
-
Select the machine.
-
Click [Next].
-
Click [Manage Color Settings].
-
Select the setting you want to delete and click [Delete].
A dialog box appears.
-
On the confirmation screen, click [Yes].
-
Check that the setting is deleted properly.