
Managing the PC Fax Phone Book
This section describes how to edit the phone book for PC Fax from your computer.
Registering a Destination Fax Number
Note
You cannot register the same name. You can register the same fax number with a different name.
-
Click [Start], and then select [Devices and Printers].
-
Right-click the OKI MC873 icon, and then select [Printing preferences] > [OKI MC873(FAX)].

-
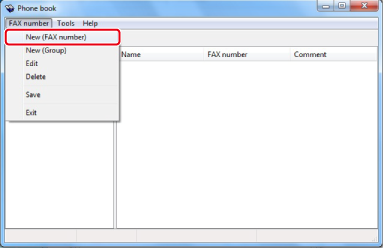
Click [Phone book] on the [Setup] tab.
-
Select [New (FAX number)] from the [FAX number] menu.
-
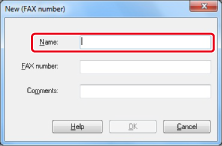
Enter a destination name in [Name] in the [New (FAX number)] dialog box.
-
Enter the fax number of the destination in [FAX number].
-
Enter comments in [Comments] if necessary.
-
Click [OK].
-
Select [Save] from the [FAX number] menu.
-
Click [OK] in the confirmation window.
-
Select [Exit] from the [FAX number] menu.
Memo
-
You can register up to 1000 destinations.
-
The name and fax number that are entered by following the procedure can be printed on the cover sheet.
Registering Multiple Destinations as a Group
If you group registered destinations, you can send a fax to multiple destinations at the same time.
-
Click [Start], and then select [Devices and Printers].
-
Right-click the OKI MC873 icon, and then select [Printing preferences] > [OKI MC873(FAX)].
-
Click [Phone book] on the [Setup] tab.
-
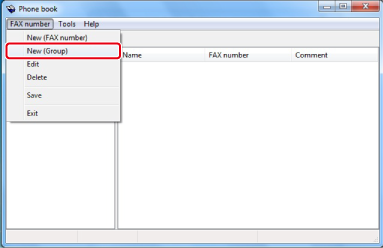
Select [New (Group)] from the [FAX number] menu.
-
Enter a group name in [Group name] in the [New (Group)] dialog box.

-
Enter comments in [Comments] if necessary.
-
Select the destination to register in the group, and then click [Add->].
-
When you complete the addition of the required fax numbers, click [OK].
The new group is added in the left field in the [Phone book] dialog box. If you select a group, the fax numbers that are registered in the group are displayed in the right field of the dialog box.
-
Select [Save] from the [FAX number] menu.
-
Click [OK] in the confirmation window.
-
Select [Exit] from the [FAX number] menu.
Exporting the Phone Book Data to a CSV File (Export)
The import/export function enables you to manage fax numbers in the phone book that is created with a different computer. If you follow the procedure below, you can export a phone book that is created with your computer so that the phone book can be used on a different computer.
Note
You cannot export any group, but you can export each entry in the phone book.
-
Click [Start], and then select [Devices and Printers].
-
Right-click the OKI MC873 icon, and then select [Printing preferences] > [OKI MC873(FAX)].
-
Click [Phone book] on the [Setup] tab.
-
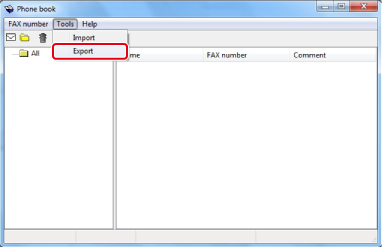
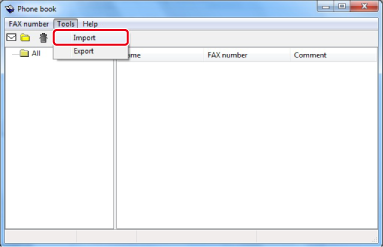
Select [Export] from the [Tools] menu.
-
Select a save destination in the [Export to file] dialog box.
-
Enter the name of a file, and then click [Save].
The phone book data is exported as a CSV file. The entries are separated with commas, and displayed in order of display in the CSV file. They are saved in order of the names, fax numbers, and comments.
-
Close the phone book.
Importing the Phone Book Data That is Exported to a CSV File (Import)
The import function enables you to import fax numbers in the phone book that is created with a different computer into your computer.
Note
Registered entries are not imported.
Importing the Phone Book Data
-
Copy the exported phone book to a different computer.
-
Click [Start], and then select [Devices and Printers].
-
Right-click the OKI MC873 icon, and then select [Printing preferences] > [OKI MC873(FAX)].
-
Click [Phone book] on the [Setup] tab.
-
Select [Import] from the [Tools] menu.

-
Specify the copied file for [Choose a CSV file] in the [Import Phone Book] dialog box.
-
Click [Browse] to select a file.
-
Click [Next].
Associating a New Definition with the Phone Book Format
If you want to import a CSV file with the format that is different from that of the phone book, select a CSV definition file and associate the definition with the phone book format.
-
Copy the exported phone book to a different computer.
-
Click [Start], and then select [Devices and Printers].
-
Right-click the OKI MC873 icon, and then select [Printing preferences] > [OKI MC873(FAX)].
-
Click [Phone book] on the [Setup] tab.
-
Select [Import] from the [Tools] menu.
-
Specify the CSV file to import in [Choose a CSV file] in the [Import Phone Book] dialog box.
-
Select the [Setup relationship between the fields imported and phone book] check box.
-
Specify a CSV definition file in [Choose a CSV Definition file] if necessary.
Select [Comma(,)] for [Field Delimiter].
Memo
You can continue operating even if you do not specify a definition file. If you do not specify a definition file, select whether to save a new definition file in the dialog box that is displayed after step 7.
-
Click [Next].
-
Associate the definition that you are importing with the phone book definition, and then click [OK].
-
Select [Save] from the [FAX number] menu.
-
Click [OK] in the confirmation window.
-
Select [Exit] from the [FAX number] menu.