
When using Server Authentication system for the user authentication, make server settings on the web browser.
The procedure when using the LDAP authentication server is used as an example.
-
Open the Web page of the machine.
-
Log in as the administrator.
-
Click [User Management].
-
Click [LDAP Authentication Setting].
-
Click [LDAP Authentication Setting].
-
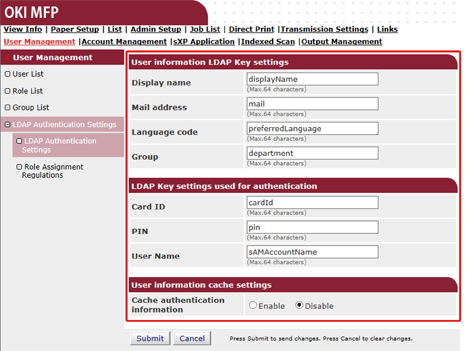
Enter an LDAP key to obtain information.
Display name: Specify the attribute key to obtain the display name of the user information.
Mail address: Specify the attribute key to obtain the E-mail address of the user information.
Language code: Specify the attribute key to obtain the language code of the user information.
Group: Set when automatically assigning users to groups.
Card ID: Set when using IC card authentication. You do not need to enter if you do not use the IC card authentication.
PIN: Set when using the PIN authentication. You do not need to enter if you do not use the PIN authentication.
User Name: Sets the attribute key of the user name registered in the LDAP server.
-
The default User Name is set to “sAMAccountName”, the attribute key of Windows server.
The Windows server users do not need to change the setting.
Use with the default setting.
Cache authentication information: [Cache authentication information] in [User information cache settings] specifies whether to save the LDAP authentication information into the cache the machine.
This setting is to set if you temporarily save authentication information in the machine. "Disable" (does not cache) is set by default. Enabling this setting allows you to unlock the authentication whenever you want to use the machine, even if you cannot connect to the LDAP server due to communication errors.
Validity period of cash authentication information : Enabling [Cache authentication information] displays the setting items. You can set an expiration date for the cache authentication information. The setting can be entered in one-day increments. 1 to 2000 days can be set. When the specified days elapse from when the authentication using the authentication server succeeds, the cache authentication is not available anymore.
-
-
Press [Submit].
-
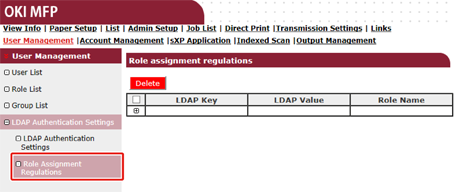
Click [Role Assignment Regulations].
Sets a rule for assigning roles to LDAP authentication users. When registering role assigning rules, register a set of LDAP key/value and role name. The String type attribute key can only be used. To set a rule to assign a role, press the [LDAP Authentication Settings] button on the [User Management] screen, press [Role assignment regulations] button to open the [Role assignment regulations] screen. The entry box is blank by default.
-
To add a new rule for assigning a role, click [+].
-
When the role assigning screen appears, enter the required information.
The screen in step 8 is used as an explanation. In this case, "Role A" is assigned if the attribute key "department" is "team A". Up to 5,000 role assignment regulations can be registered. Up to 50 types of character strings of attribute key can be set in LDAP key. You can enter up to 64 characters. If several regulations match one user, all the roles are assigned. If no role is found, [.DefaultRole] is assigned.
To add role assignment regulations, press the [+] button on the [Role assignment regulations] screen. When the [+] button is pressed, the role assignment registration windows pops up. Enter "LDAP Key" and "LDAP Value" on the popup screen, select a role to be assigned when the condition matches, and then press the registration button to register the regulation.
-
Press [Submit].