
This section explains how to load paper in tray and print from tray.
Regarding media flexibility, please refer to "Supported Paper", "Paper Loaded on the Tray".
This procedure explains to load paper in tray 1. The same procedure is applied to tray 2/3/4/5 (optional).
-
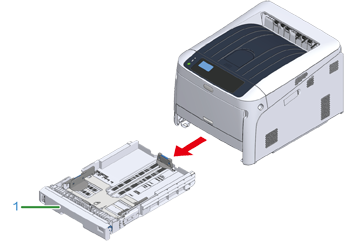
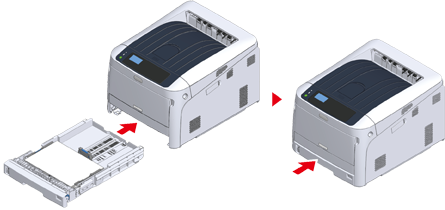
Pull out the paper cassette (1).
-
Set the paper size dial (2) to match the size of the paper to be loaded.
Set the dial to [A4
 ] when loading A4 size paper in horizontal orientation.
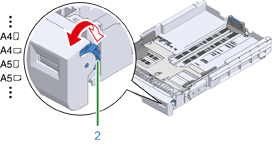
Memo
-
If the size of paper cannot be found in items of the dial, set "Other".
Note
-
Make sure to match the size of paper and that on the paper size dial. Otherwise, paper size error occurs and printing cannot be done.
-
For size of paper which can be loaded either horizontal or vertical such as A4, please be careful of the direction.
-
The paper size, paper type, and paper thickness of the tray are sometimes displayed on the panel. You can change the setting to hide the screen. To hide this screen, select [Admin Setup] > [Panel Setup] > [Paper setup when paper exchange] and set it to [Off].
-
-
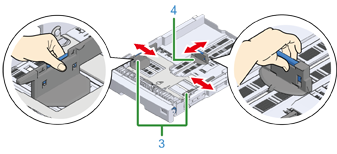
Pinch the blue parts of the paper guide (3) and paper stopper (4) and slide them according to the size of paper you set.
-
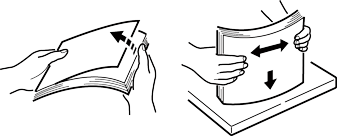
Fan a stack of paper well, and then align the edges of the paper.
-
Load paper with the print side face down.
Note
-
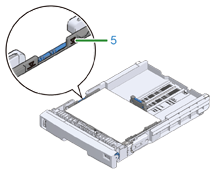
Do not load paper above the "
 " mark (5) on the paper guide.
-
-
Secure the loaded paper with the paper guide.
-
Check if a size of loaded paper matches the setting of paper size dial.
Note
-
If the size of paper and that on the paper size dial do not match, paper size error occurs and printing cannot be done.
-
-
Return the paper cassette to the printer.
-
If using media that you cannot select the size with a paper size dial options, set the dial to [Other], and then set [Custom Size] on the operator panel and enter the width and length of paper.
See "Printing on Custom Size Paper".
If the size of paper whose size can be found on the dial such as A3 and A4, set [Cassette Size]. The factory default is [Cassette Size] and you do not need to change usually.
Open a file you want to print, and print it in the following procedure
-
For Windows PCL Printer Driver
-
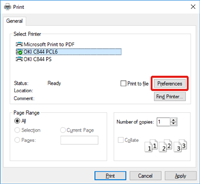
Select [Print] from the [File] menu.
-
Click [Preferences] (or [property]).
-
On the [Setup] tab, select a paper size from [Size].

-
Select [Tray 1] from [Source].
-
Click [OK].
-
Click [Print] on the [Print] Screen.
-
For Windows PS Printer Driver (C834/C844/ES8434)
-
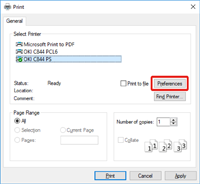
Select [Print] from the [File] menu.
-
Click [Preferences] (or [property]).
-
Select the [Paper/Quality] tab.
-
Select [Tray 1] from [Paper Source]
-
Click [Advanced].
-
Click [Paper Size] and select a paper size from the drop-down list.
-
Click [OK].
-
Click [Print] on the [Print] Screen.
-
Mac PS Printer Driver (C834/C844/ES8434)
-
From the [File] menu, select [Page Setup].
-
Select a paper size from [Paper Size] and then click [OK].
-
From the [File] menu, select [Print].
-
Select [Paper Feed] from the panel menu.
-
Select [All pages From] and then select [Tray 1].
-
Start printing.
-
Mac PCL Printer Driver (C824 Only)
-
From the [File] menu, select [Page Setup].
-
Select a paper size from [Paper Size] and then click [OK].
-
From the [File] menu, select [Print].
-
Select [Setup] from the panel menu.
-
Select [Tray 1] from [Paper Source].
-
Start printing.