
When the "Belt Unit Near Life" message appears on the display screen, prepare a replacement belt unit. You can keep printing approximately 2,000 pages until the next message appears.
When the "Change Belt Unit" message appears, replace the belt unit.
The life expectancy of the belt unit is approximately 80,000 pages for A4 simplex printing (three pages per job).
Note
-
The actual number of pages you can print with the belt unit depends on how you use it.
-
"Install New Belt Unit" may be displayed without "Belt Unit Near Life" being displayed. Replace the belt unit in this case, too.
-
When "Change Belt Unit" is displayed and printing is stopped, quickly replace with a new fuser unit. Although printing is resumed by opening and closing the front cover, this may cause a malfunction or cause print quality to deteriorate. Also, after a fixed time has elapsed, printing is no longer possible even by opening and closing the front cover. (The fixed time that printing is possible differs according to the operating status.)
-
When the [Admin Setup] > [Panel Setup] > [Near Life Status] is set to [Disable], the [Belt Unit Near Life] message does not appear.
-
Use extra care when handling the image drum (the green cylinder), because it is fragile.
-
Do not expose the image drum to direct sunlight or very bright interior light (approximately more than 1,500 lux). Even under the normal interior light, do not leave it for more than 5 minutes.
Memo
-
You can change the setting for displaying the "Belt Unit Near Life" message. Set from [Admin Setup] > [Others Setup] > [Near Life Setup] > [Belt Near Life Timing]. Available values are from 500 to 5,000 (in 500 increments).
-
Prepare a replacement belt unit.
-
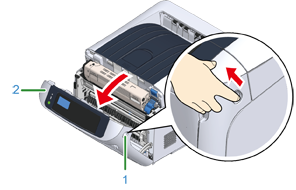
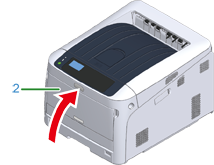
Insert your finger into the recess on the right side of the machine and pull the front cover open lever (1) to open the front cover (2) forward.
-
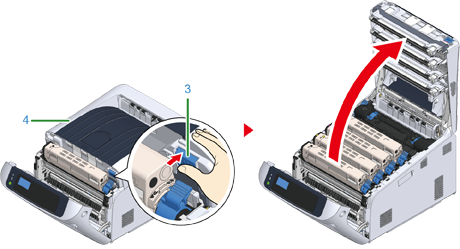
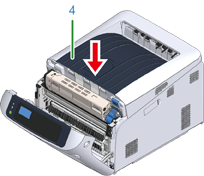
Press the open button (3) and open the output tray (4).

Burns may result.

The fuser unit is extremely hot. Do not touch it.
-
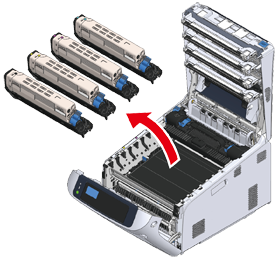
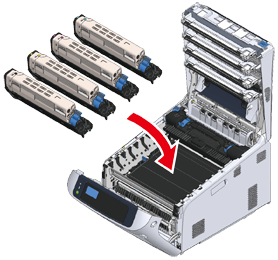
Take all the four image drums out of the machine, and then place them on a flat surface.
Note
-
Use extra care when handling the image drum (the green cylinder), because it is fragile.
-
-
Cover the image drums you took out with paper so that the image drums do not expose to the light.

-
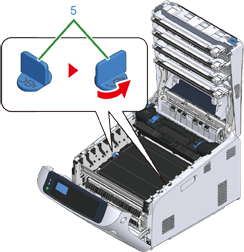
Turn the blue knobs (5) on each side of the belt unit in direction of the arrow to unlock.
-
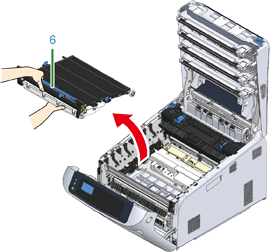
Remove the belt unit by holding the blue handle (6).
-
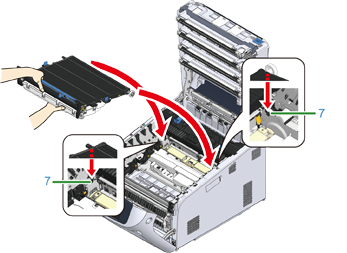
Hold the blue handle of a new belt unit, support the bottom of the belt unit, and insert the axis of the belt unit into the groove (7) in the printer.
-
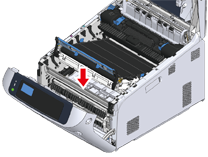
Lower the handle side of the belt unit and set the belt unit to the machine.
-
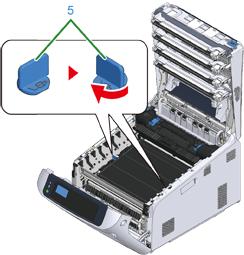
Turn the blue knobs (5) on both sides of the belt unit in the direction of the arrow to lock the belt unit.
Note
-
Do not forget to turn the knobs and lock the belt unit. If you do not turn the knobs to lock the belt unit, image drum cannot be attached properly.
-
-
Return all the four image drums to the machine.
Note
-
Use extra care when handling the image drum (the green cylinder), because it is fragile.
-
-
Close the output tray (4) by pushing the center of the output tray firmly.
-
Close the front cover (2).
Note
-
The front cover cannot be closed if the output tray is not closed securely.
-
-
Please recycle belt unit.
Memo
-
If you must dispose of a belt unit, put it in a plastic bag or similar container and dispose of it in accordance with your municipality's ordinances or guidelines.
-