
This section describes how to replace the image drum when you want to continue using the toner cartridge.
Note
-
If you use a new image drum with the toner cartridges currently in use, the remaining amount indication of the toner cartridges will not display correctly. The messages "[COLOR] Image Drum Near Life" or "[COLOR] Image Drum Life" may also be displayed soon after replacement.
-
Use extra care when handling the image drum (the green cylinder), because it is fragile.
-
Do not expose the image drum to direct sunlight or strong light (approximately 1,500 lux or more). Even under room lighting, do not leave the image drum for 5 minutes or more.
-
Use OKI genuine consumables to ensure optimum performance of the products.
-
Charges for services for problems caused by the use of consumables other than OKI genuine consumables are incurred, regardless of the warranty or in the maintenance contract. (Although use of non-genuine consumables does not always result in problems, use extra care when using them.)
Memo
-
You can change the setting for displaying the "[COLOR] Image Drum Near Life" message. Set from [Admin Setup] > [Others Setup] > [Near Life Setup] > [Drum Near Life Timing]. Available values are from 500 to 5,000 (in 500 increments).
-
Prepare new image drum.
-
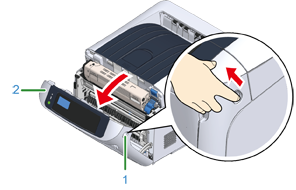
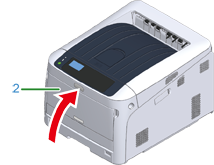
Insert your finger into the recess on the right side of the machine and pull the front cover open lever (1) to open the front cover (2) forward.
-
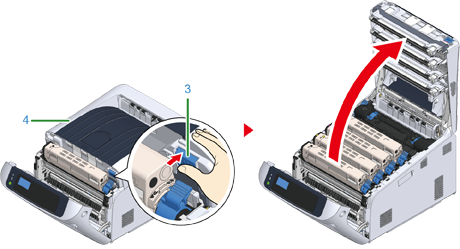
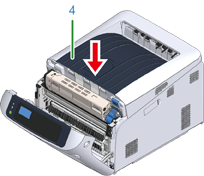
Press the open button (3) and open the output tray (4).

Burns may result.

The fuser unit is extremely hot. Do not touch it.
-
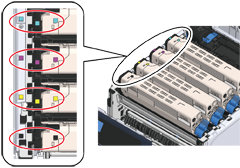
Identify the image drum to be replaced by its label color.
-
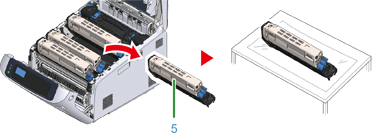
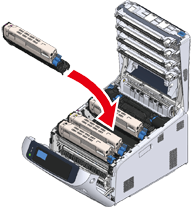
Remove the image drum (5) from the machine and place the image drum on a flat surface.
Note
-
Use extra care when handling the image drum (the green cylinder), because it is fragile.
Memo
-
Image drums are not locked on the printer. They can be removed just by lifting.
-
-
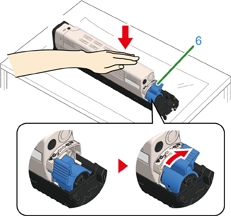
Turn the toner cartridge lock lever (blue) (6) of the toner cartridge toward you until its top align on the
 mark while pressing the toner cartridge.
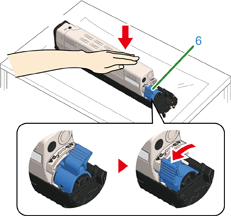
-
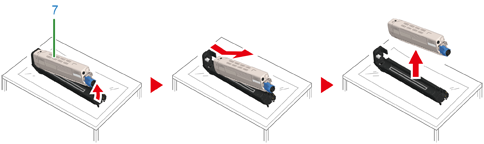
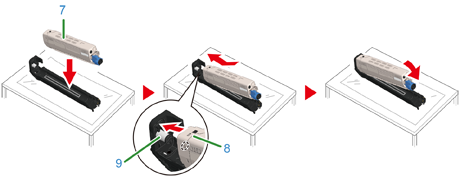
Lift the toner cartridge (7) from the right side, and remove it from the image drum.
-
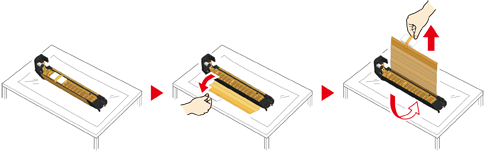
Unpack a new image drum and place it on a flat surface.
-
Remove the protective sheet and the desiccant pack.
-
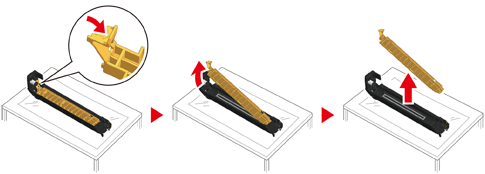
Remove the toner cover.
-
Insert the toner cartridge (7) removed in step 7 by aligning its left side indentation (8) with the protrusion (9) on the image drum so that the toner cartridge and image drum color label align. Then insert the right side gently into place.
-
Turn the toner cartridge lock lever (blue) (6) of the toner cartridge backward until its top align on the
mark while pressing the toner cartridge to attach the toner cartridge to the image drum.You will hear a click when it is locked in place.
-
Check the label color of the new image drum and place the drum into the machine.
Note
-
Use extra care when handling the image drum (the green cylinder), because it is fragile.
-
-
Close the output tray (4) by pushing the center of the output tray (4) firmly.
-
Close the front cover (2).
Note
-
The front cover cannot be closed if the output tray is not closed securely.
-
-
Please recycle image drums.
Memo
-
If you must dispose of an image drum, put it in a plastic bag or similar container and dispose of it in accordance with your municipality's ordinances or guidelines.
-