When the additional tray unit is installed, be sure to set the number of trays after the printer driver is installed.
For the information of installing the printer driver, see "Installing a Driver and Software to a Computer".
Note
-
To follow this procedure, you must log in to a computer as the administrator.
-
If your Mac OS applies to the following conditions, the information about the installed option is automatically obtained, not requiring you to set the printer driver.
- When the machine is connected to a network over Bonjour
- When the machine is connected via USB interface
- When the optional equipment is installed before the printer driver is installed
Setting Additional Tray(s) to the Windows PCL Printer Driver
-
Click [Start], and then select [Devices and Printers].
-
Right-click [OKI C542], and then select [OKI C542 PCL6] from [Printer properties].
-
Select the [Device Options] tab.
-
Enter the total number of trays and then click [OK].
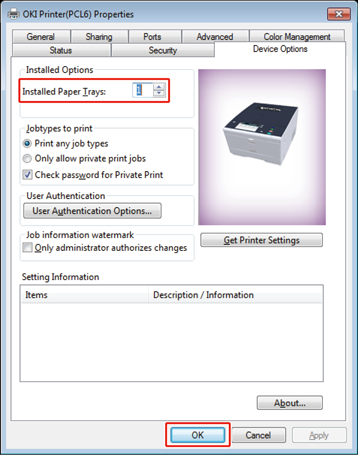
Memo
If a TCP/IP network connection is used, click [Get Printer Settings] to set the number of trays automatically.
Setting Additional Tray(s) to the Windows PS Printer Driver
-
Click [Start], and then select [Devices and Printers].
-
Right-click [OKI C542], and then select [OKI C542 PS] from [Printer properties].
-
Select the [Device Settings] tab.
-
Select [Get installed options automatically] for [Installable Options], and then click [Setup].

Memo
When using a USB connection, select the total number of trays for [Available Trays] in [Installable Options].
-
Click [OK].
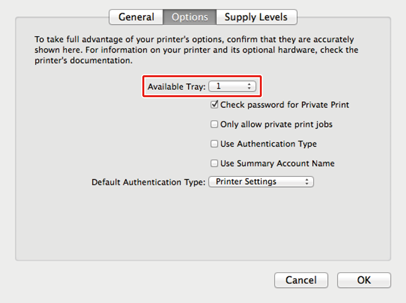
Setting Additional Tray(s) to the Mac OS X Printer Driver
-
Select [System Preferences] from the Apple menu.
-
Click [Printers & Scanners].
-
Select the machine, and then click [Options & Supplies].
-
Select the [Options] tab.
-
Select the total number of trays for [Available Tray], and then click [OK].