
When the "[COLOR] Toner Low" message ([COLOR] indicates C (cyan), M (magenta), Y (yellow) or K (black)) which appears on the display screen, prepare a replacement toner cartridge.
When the "[COLOR] Toner Empty" appears and printing stops, replace the toner cartridge.
Memo
Even if the cyan (blue), magenta (red) or yellow toner cartridges run out, you can print in black and white by selecting [Monochrome] or [Grayscale]. However, please replace the toner cartridge quickly after it runs out, as not doing so may cause the image drum to be damaged.
Note
-
Have a new toner cartridge ready, as the print quality declines after more than one year following breaking the seal.
-
If you replace the toner cartridge/image drum while it is being used, the toner consumption will not be counted normally.
-
By opening and closing the output tray after the message "[COLOR] toner has run out" is displayed, you are able to print. Please replace the toner cartridge as failure to do so may damage the image drum.
-
Toner powder may spill if you remove a toner cartridge before the toner runs out.
-
Prepare new toner cartridges.
-
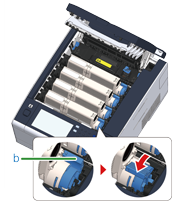
Press the button (A) and open the output tray (a) completely.

Burns may result.

The fuser unit is extremely hot. Do not touch it.

-
Identify an empty toner cartridge by its label color.
-
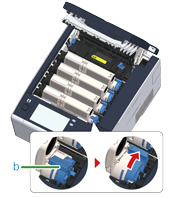
Pinch the tip of blue lever (b) of the toner cartridge and turn it toward you until the tip aligns on the lug of the cartridge.
-
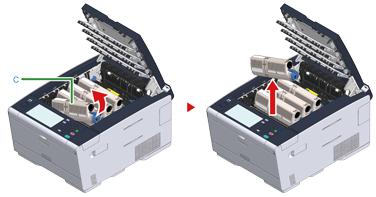
Lift the toner cartridge (c) from right side, and remove it from the machine.

Burns may result.
Never throw a used image drum or toner cartridge into a fire. They may explode, and the toner inside may fly off and cause burns.
Note
While removing consumables, be careful not to hit them to the LED head.
-
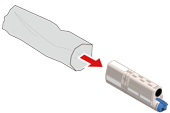
Unpack a new toner cartridge.
-
Shake the cartridge several times vertically and horizontally.

-
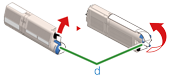
Remove the tape (d) from the toner cartridge.
-
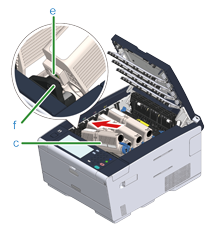
Insert a new toner cartridge (c) by aligning its left side indentation (e) with the protrusion (f) on the image drum so the toner cartridge and image drum color labels align. Then insert the right side gently into place.
Note
Do not insert a toner cartridge without removing the tape.
-
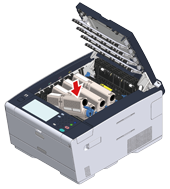
Hold the cartridge, pinch the tip of blue lever (b) of the toner cartridge, and turn forward until the tip aligns on the lug of the cartridge.
Note
-
If you close the output tray without turning the blue lever when installing the toner cartridge into the image drum, it may cause a malfunction. Be sure to turn the blue lever until its top aligns on the lug in the back of the toner cartridge.
-
If the toner cartridge is not securely attached, printing quality may deteriorate.
-
-
Wipe the lens of the LED head with a soft tissue paper lightly.
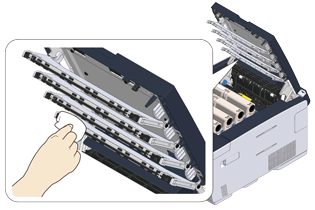
Note
Do not use solvents, such as methyl alcohol or thinners. They damage the LED head.
-
Close the output tray (a) slowly and push the center of the output tray for confirmation.

-
Please recycle toner cartridges.
Memo
If you have to dispose of used toner cartridges, put them into polyethylene bags or other container, and be sure to follow the regulations or instructions of your local government.