
使用 WIA 驅動程式 (Windows)
本節說明如何透過 USB 或 WSD 掃描連線從與 WIA 相容的應用程式啟動掃描。
筆記
-
WIA 驅動程式不支援網路掃描功能。 透過 USB 介面或 WSD 掃描將機器連接至電腦。
-
WIA 驅動程式不支援 Mac OS X。
-
WIA 2.0 驅動程式支援 Windows 10/Windows 8.1/Windows Sever 2012 R2/Windows 8/Windows Server 2012/Windows 7/Windows Server 2008 R2。
-
WIA 1.0 驅動程式支援 Windows Vista/Windows Server 2008/Windows Server 2003。
若要使用 WIA 驅動程式掃描,則需要如安裝掃描器驅動程式的準備程序。
同時您也須先將機器設定在遠端掃描的待機模式中,再開始在電腦上掃描。
掃描
筆記
下列步驟使用 Adobe Photoshop CS3 作為範例。
-
將文件置於自動送稿機或放到文件玻璃上。
-
啟動電腦上的 Adobe Photoshop CS3。
-
從 [File (檔案)] 中選擇 [Import (匯入)],然後為 USB 連線選擇 [WIA:OKI Universal WIA (WIA:OKI 通用 WIA)],或為 WSD 掃描選擇 [WIA-OKI-XXXXX (WIA-OKI-XXXXX)]。
-
按一下 [掃描]。
-
選擇送紙方法。
-
選擇影像類型。
-
指定要掃描的區域。
-
按一下 [掃描]。
-
若要完成掃描,請按一下 [取消]。
-
如果不需掃描其他頁面或背面,請按一下 [離開]。
使用 Windows 傳真和掃描
Windows 10/Windows 8.1/Windows 8/Windows 7/Windows Vista 提供「Windows 傳真和掃描」功能。
-
將文件置於自動送稿機或放到文件玻璃上。
-
在電腦上啟動 Windows 傳真和掃描。
對於 Windows 7/Vista:
-
在 Windows 上按一下 [Start (開始)],然後選擇 [All Programs (所有程式)] > [Windows FAX and Scan (Windows 傳真和掃描)]。
對於 Windows 8:
-
在 [Start (開始)] 畫面上按一下滑鼠右鍵,然後選擇 [All Apps (所有應用程式)] > [Windows FAX and Scan (Windows 傳真和掃描)]。
對於 Windows 8.1:
-
按一下 [Start (開始)] 畫面上的向下箭頭圖示,然後選擇 [Windows FAX and Scan (Windows 傳真和掃描)]。
對於 Windows 10:
-
在 Windows 上按一下 [Start (開始)],然後選擇 [All Apps (所有應用程式)] > [Windows Accessories (Windows 附屬應用程式)] > [Windows FAX and Scan (Windows 傳真和掃描)]。
-
-
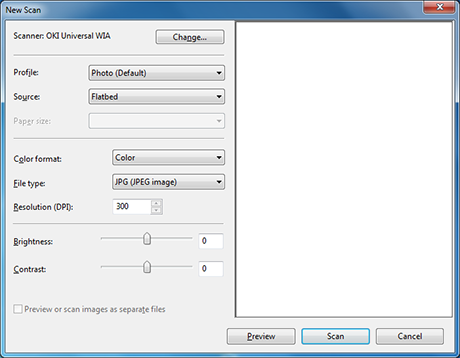
按一下 [新掃描]。
-
對於 USB 連線選擇 [OKI Universal WIA (OKI 通用 WIA)] 或對於 WSD 掃描選擇 [OKI-XXXXX (OKI-XXXXX)],然後按一下 [OK (確定)]。
-
視需要進行設定。
-
按一下 [掃描]。
-
結束 [Windows 傳真和掃描]。